A great way to encourage local business is to give your customers the option to pick up their order in-store or curbside for free. Use this guide to add a local ‘click & collect’ pickup option to your store.
This guide will explain how to quickly add a Local Pickup Scenario to your existing paid shipping setup.
There are a few different ways to set this up, depending on your preference:
Add a free local pickup option to a Scenario that uses a ‘city’ customer condition to limit when free pickup is available.
This setup works well if you want to limit local pickup to an entire city or a cluster of cities.
There are two postal code options: The first is similar to the ‘City’ setup, except the Scenario uses a simple ‘postal code/zip code’ customer condition. The second uses local sub-zones already configured in your Zones settings.
This setup works well if you want offer local pickup to certain postal codes or ZIP codes within your immediate vicinity. You can either include local postal codes or exclude long-distance ones. If you’re already using sub-zones, you can take advantage of them here.
Add a local delivery shipping method to a Scenario and use a distance radius to determine who is eligible for local pickup.
This setup works well if your local pickup option cannot rely on city or postal code borders.
Add A Local Pickup Option For Cities
This setup uses a ‘city’ customer condition to restrict local pickup from being displayed at checkout.
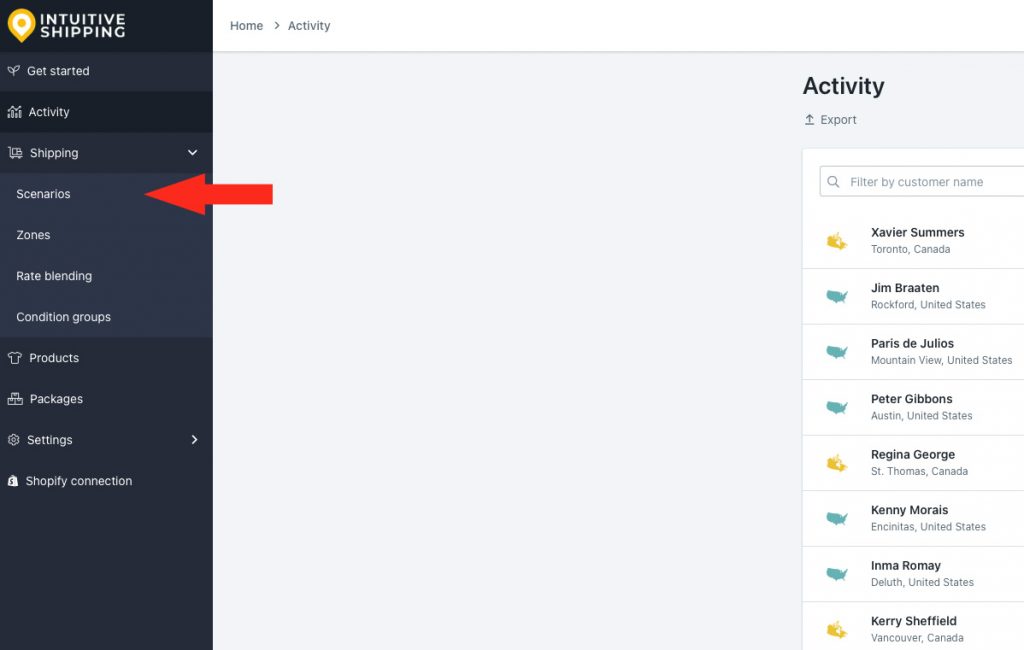
1) Click Shipping on the sidebar menu, then select Scenarios from the drop-down list.
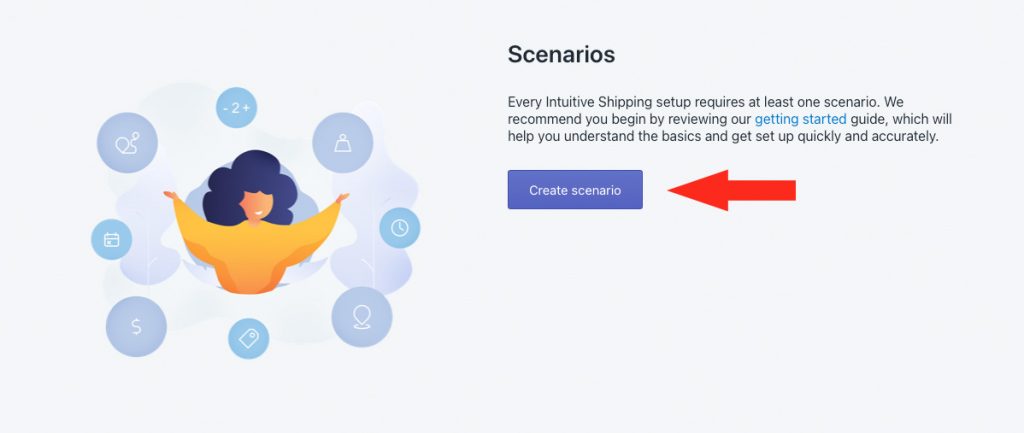
2) Click the Create scenario button.
General Settings
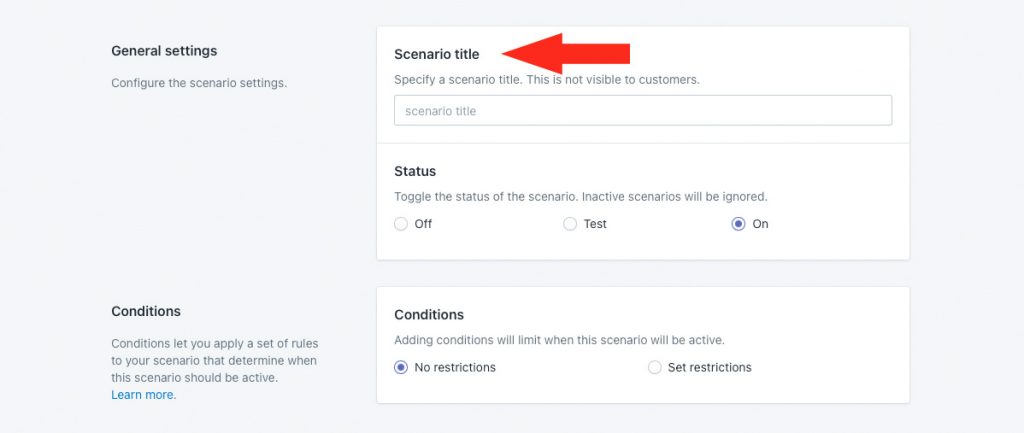
1) Enter a Scenario title, like ‘Local Pickup – Toronto’.
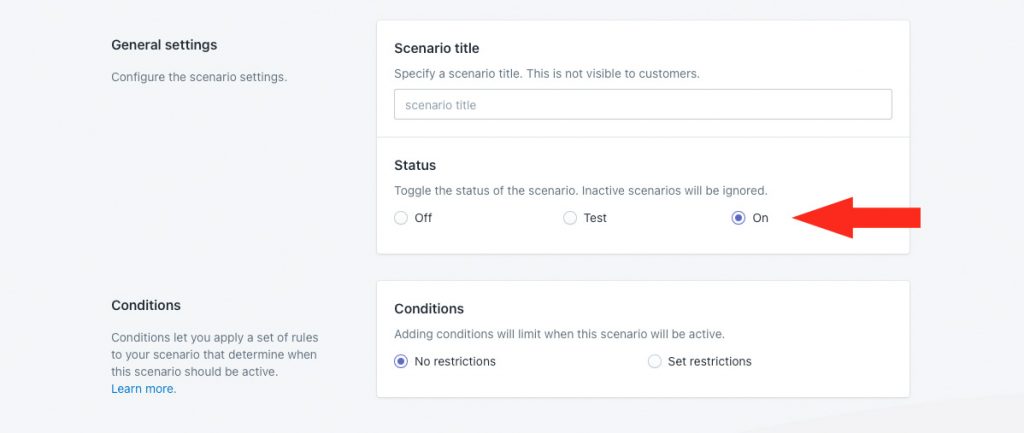
2) Leave the status set to On.
Conditions
1) Select Set restrictions.
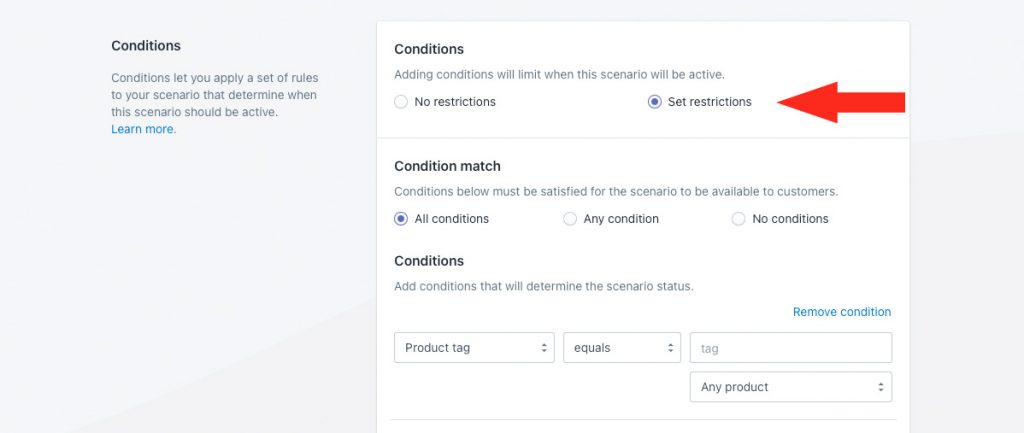
2) Leave Condition match set to All conditions.
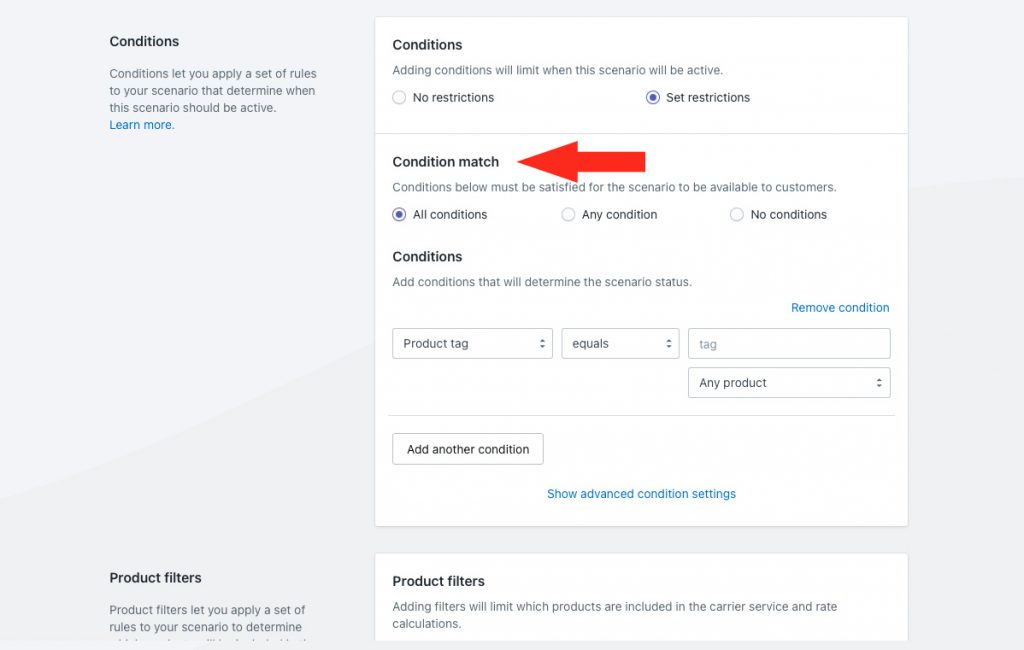
3) Select the City condition type.
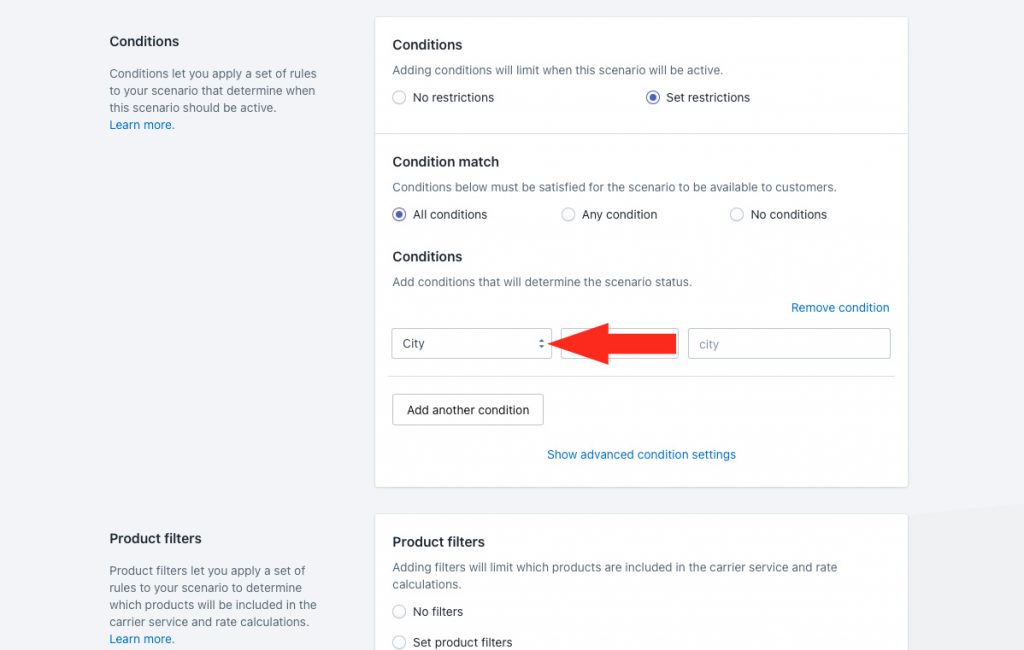
4) Select the condition logic.
For this example, we’ll leave it set to equals, since we want customers from the city (or cities) entered in Step 5 to get the local pickup option. If you prefer to prevent customers from a city (or cities) from getting local pickup, change the logic to does not equal.
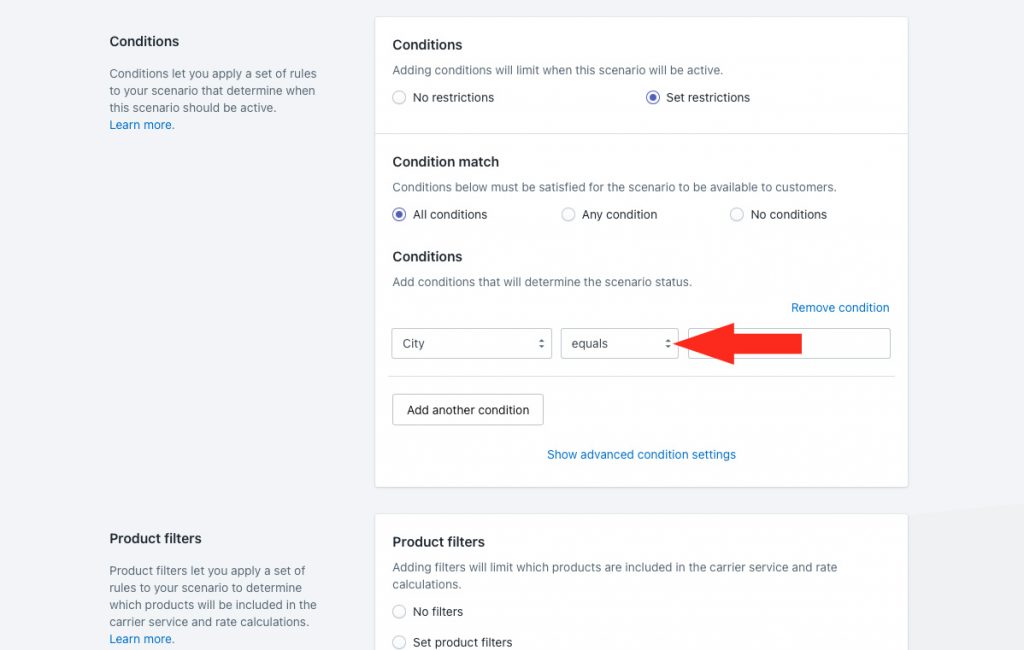
5) Enter the city name as the condition value. If desired, you can add multiple city names, separated by comma.
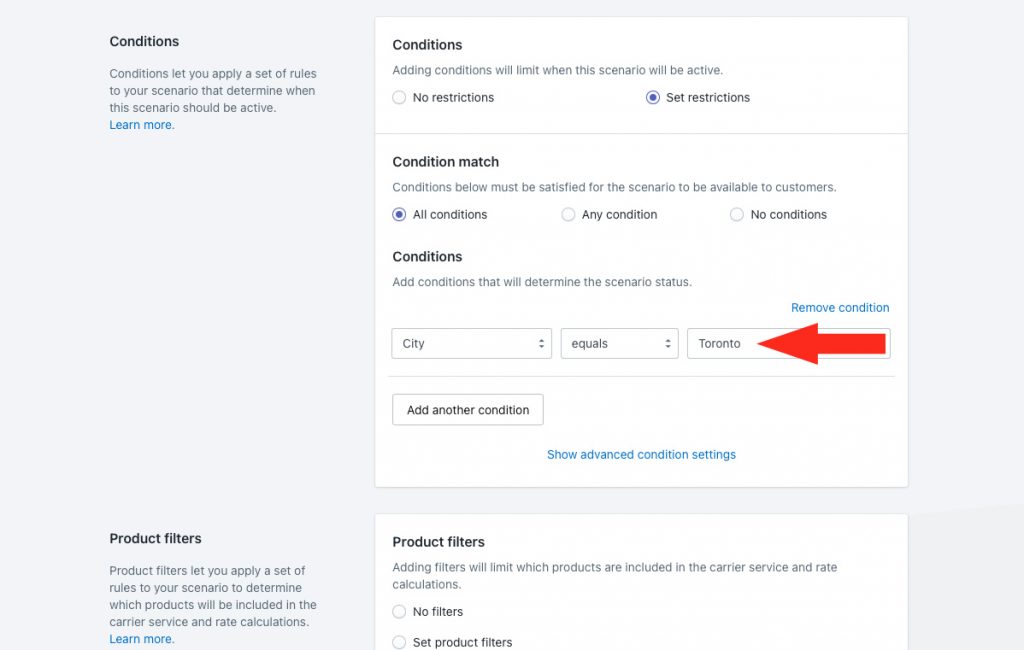
That means, if you want to either allow or prevent multiple cities from being eligible for local pickup, do not add more condition rows. By doing so, a customer’s address would need to include every city on the list, which is impossible.
Instead, add multiple cities to a single condition value, separated by comma, like ‘City equals Vancouver, Richmond, Surrey’. This allows customers from any of these cities to meet that condition.
Product Filters
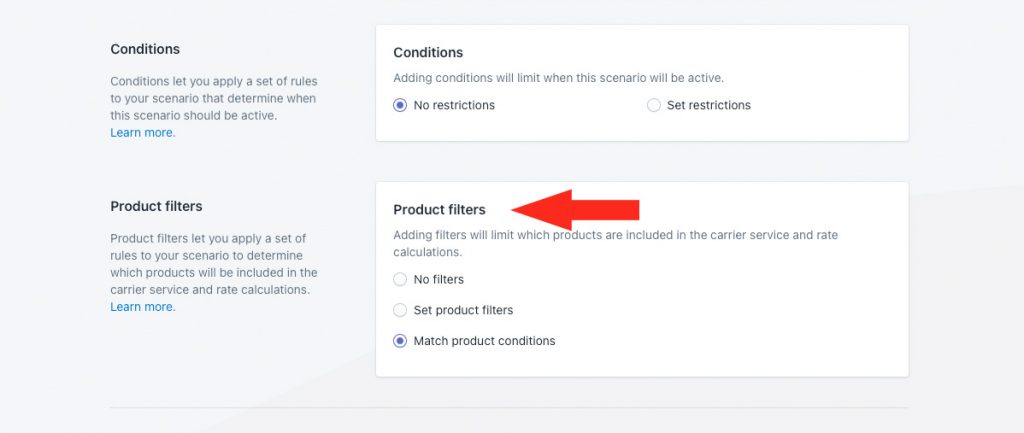
1) Leave Product filters set to Match product conditions.
Product filters determine which products are included in the shipping method rate calculation. Because there are no product conditions in this setup, ‘Match’ is treated the same as ‘No filters’.
Save Your Settings
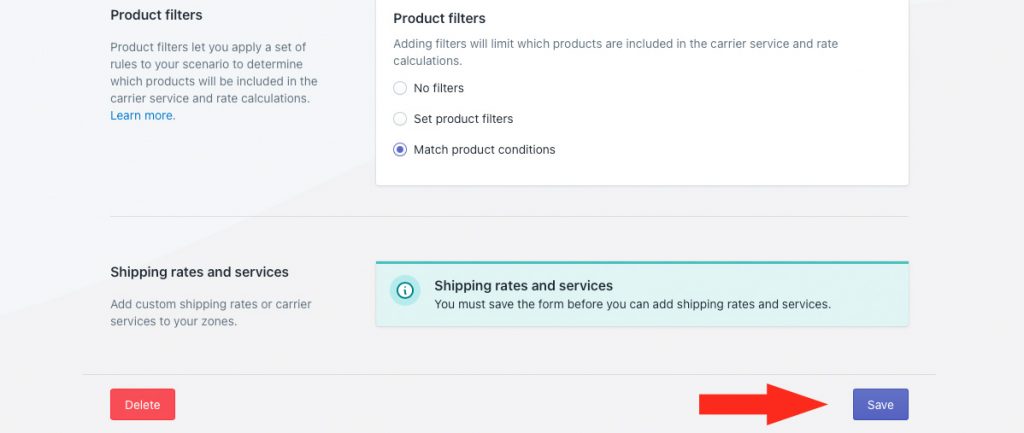
1) Click the Save button to save your local pickup Scenario.
Add A Local Pickup Shipping Method
In order to display a local pickup option at checkout, you still need to add a ‘shipping’ method to the Scenario.
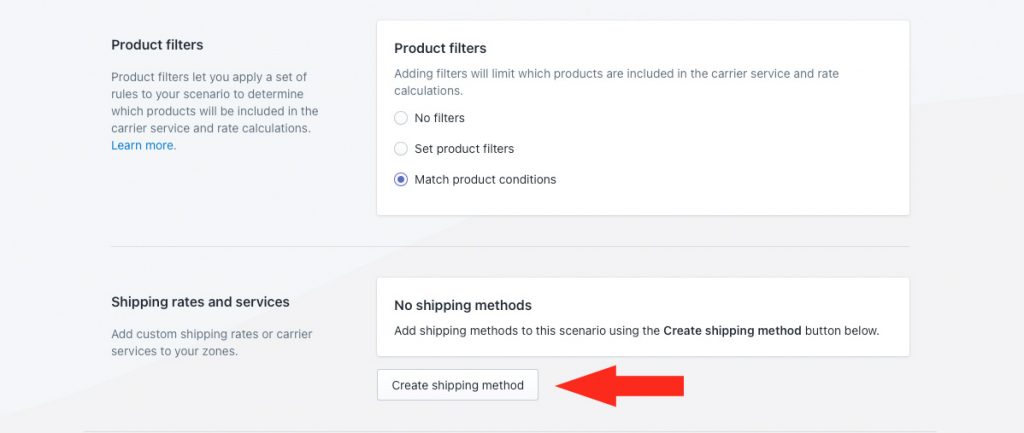
1) Click the Create shipping method button to add a free local pickup option.
Select A Free Shipping Service
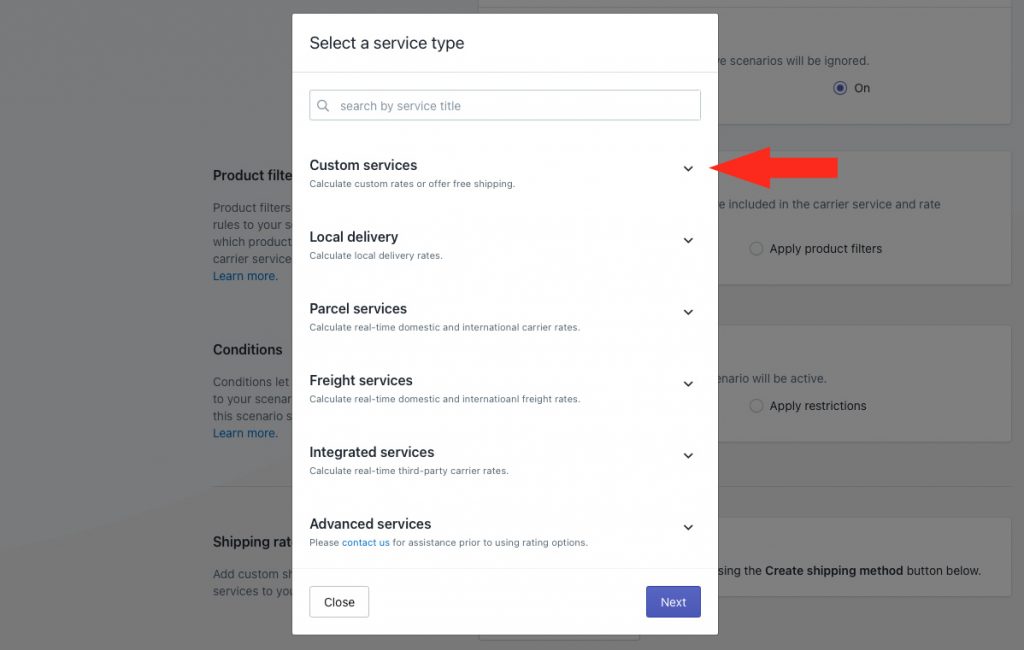
1) Click the downward arrow beside Custom services to display a list of options.
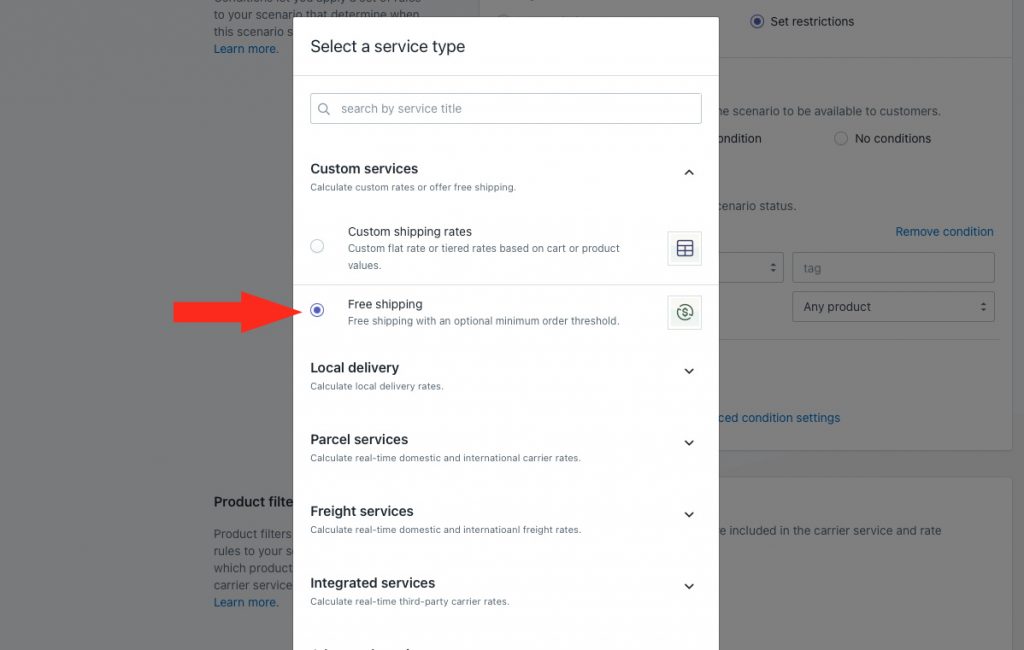
2) Select Free shipping from the list.
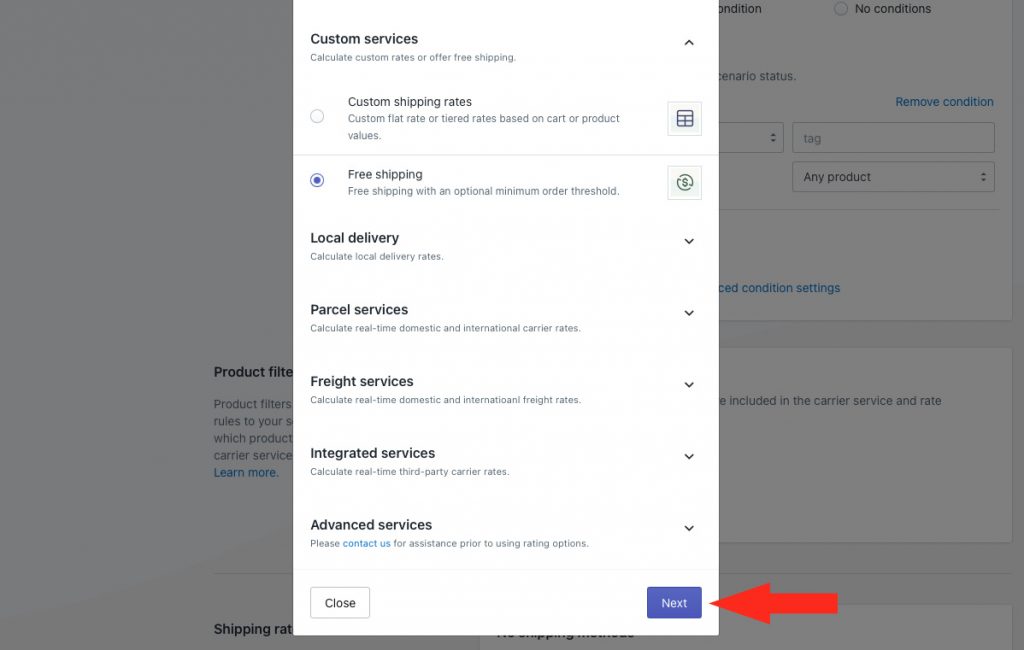
3) Click the Next button.
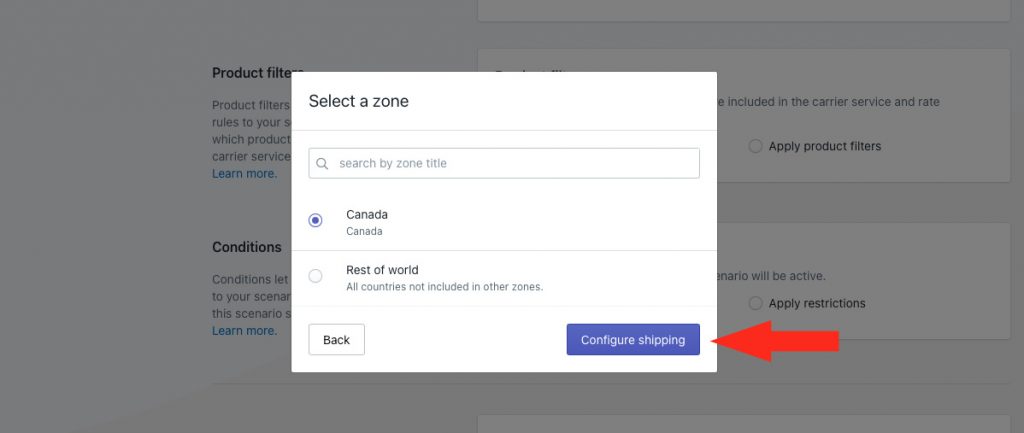
4) Select a Zone. You must select the zone that applies to the city (or cities) referenced in your Scenario conditions.
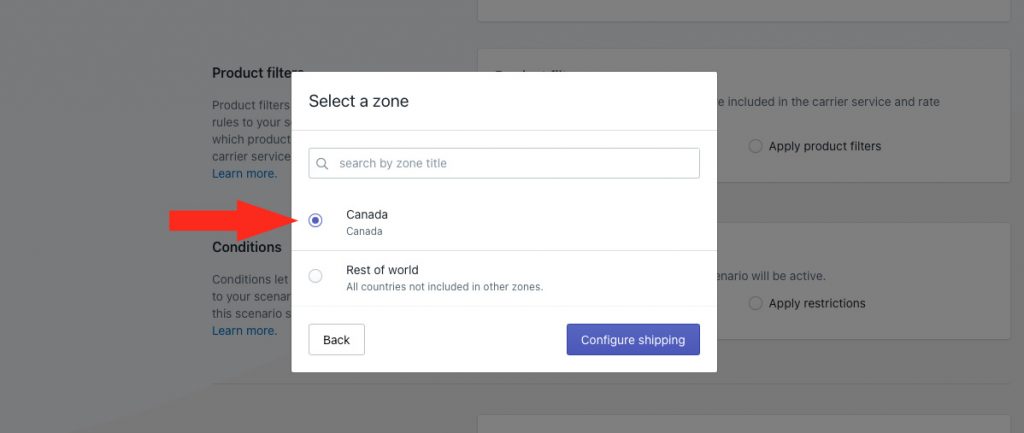
5) Click the Configure shipping button.
General
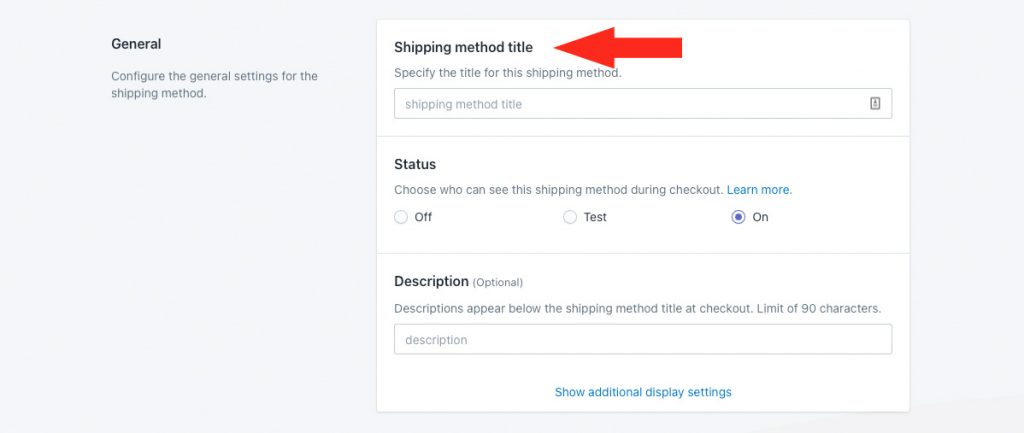
1) Enter a shipping method Title, like ‘Local In-store Pickup’ or ‘Curbside Pickup’. The title entered here will be visible to customers.
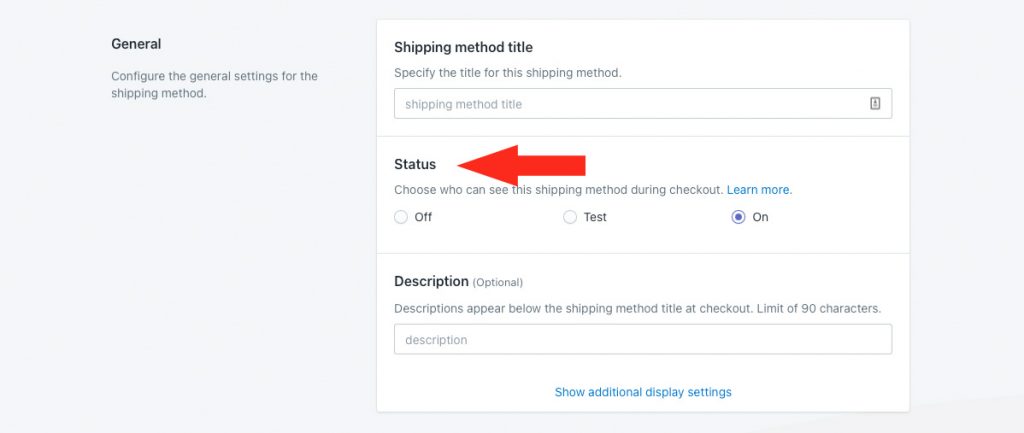
2) If you want the local delivery option to be available right away, leave the status set to On. If you want to test it first before making it public, set it to Test.
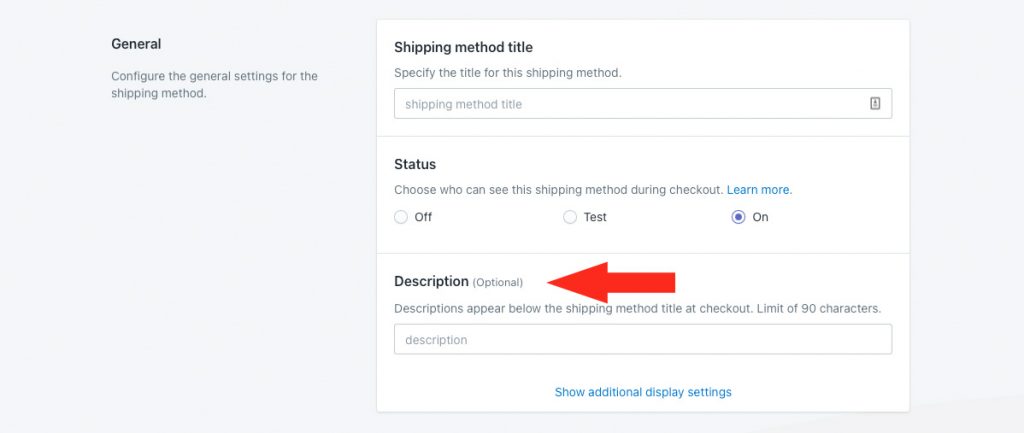
3) Enter a description for your local pickup option, like ‘Call to arrange a pickup time’. We recommend limiting your description to 90 characters or less to ensure it displays properly on the checkout page.
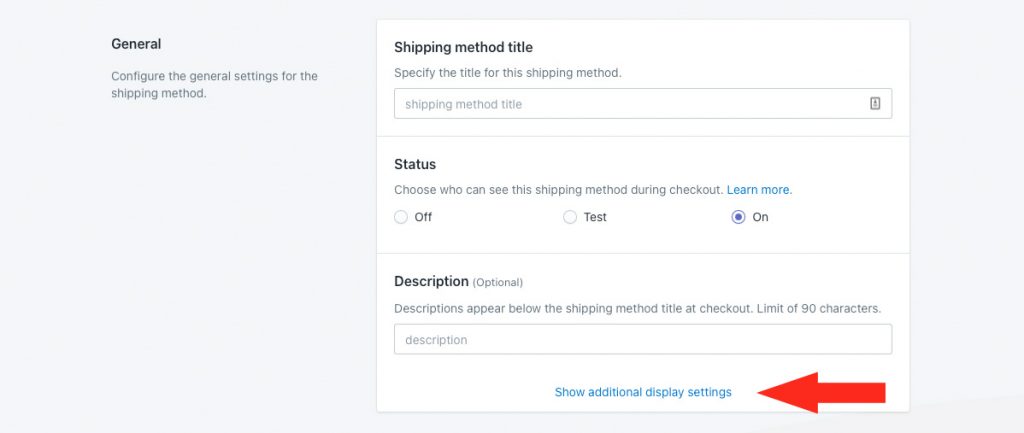
Additional display settings are available for delivery times and service codes, which may not apply to your local pickup option. If you do need to adjust either of these settings, continue to Step 4. Otherwise, skip ahead to Minimum Order Threshold.
4) If desired, click Show additional display settings, then configure delivery time and service code settings as needed.
Minimum Order Threshold
Order thresholds are typically used for free shipping options. If desired, you can also limit when local pickup is activated by setting a threshold, such as an order minimum or a weight maximum.
1) Choose if you want to apply a free shipping threshold to your local pickup option.
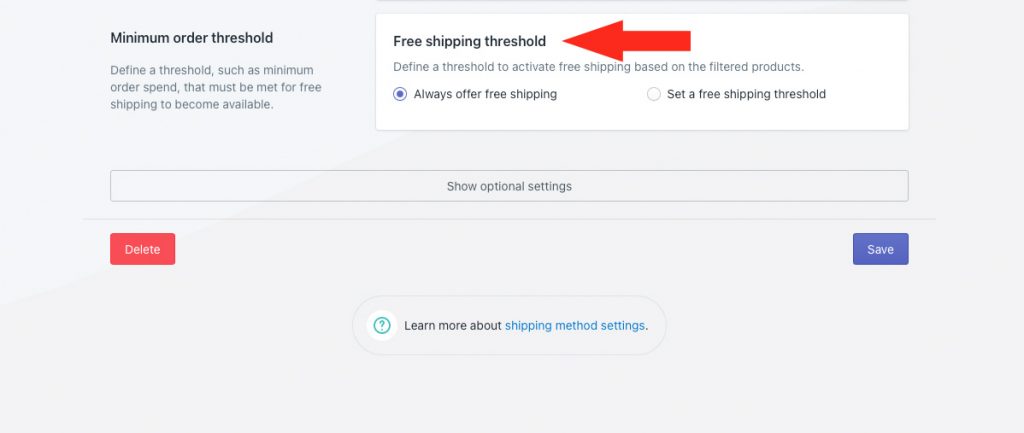
You have two (2) settings to choose from:
Always offer free shipping – the free local pickup method will always be displayed to customers as long as the city condition is met.
If you select the ‘Always’ option, skip ahead to Optional Settings.
Set a free shipping threshold – the free local pickup method will only be displayed to customers when the city condition is met and the threshold is exceeded.
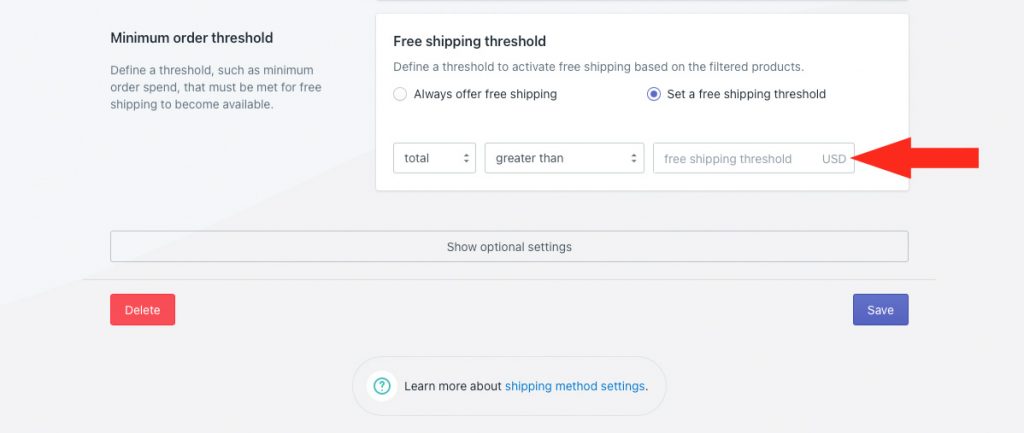
2) If you choose to set a threshold, select a threshold type.
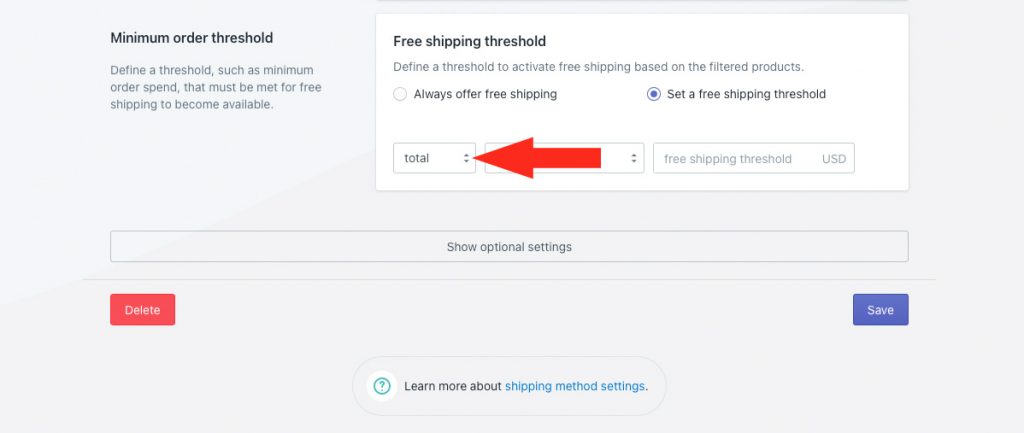
You have three (3) settings to choose from:
Total – the local pickup option will be activated based on the total value of items in the cart.
Quantity – the local pickup option will be activated based on the total number of items in the cart.
Weight – the local pickup option will be activated based on the total weight of items in the cart.
3) Select a free shipping threshold logic.
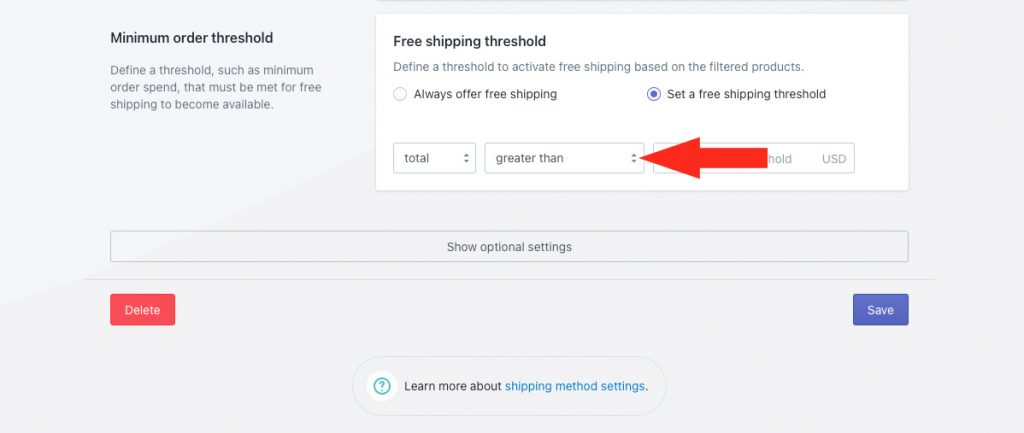
You have six (6) options to choose from:
Greater than – the local pickup option will activate when the actual cart value is more than the value entered in Step 4.
Greater than or equals – the local pickup option will activate when the actual cart value is equal to or more than the value entered in Step 4.
Less than – the local pickup option will activate when the actual cart value is less than the value entered in Step 4.
Less than or equals – the local pickup option will activate when the actual cart value is equal to or less than the value entered in Step 4.
Equals – the local pickup option will activate when the actual cart value is exactly the same as the value entered in Step 4.
Does not equal – the local pickup option will activate when the actual cart value is anything but the value entered in Step 4.
4) Enter the free shipping threshold value. The local pickup option will activate when this threshold is exceeded, depending on the settings selected in Steps 2 and 3.
Optional Settings
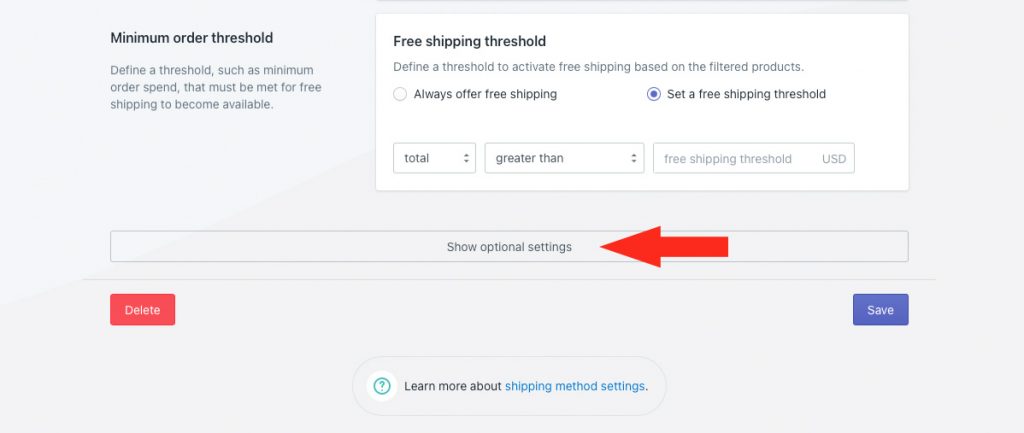
Settings for custom shipping blending and rate blending give you further control of how shipping is calculated at checkout.
These settings are not required for this setup, and you can skip ahead to Save Your Settings.
Save Your Settings
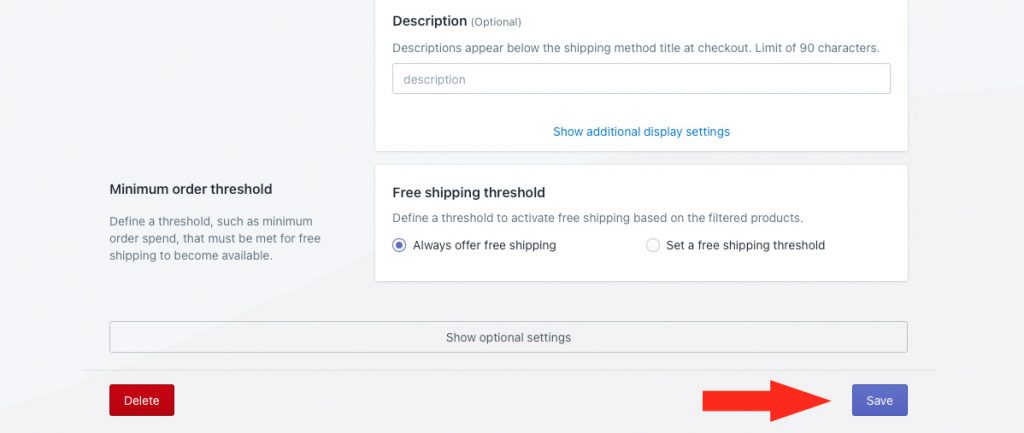
1) Click the Save button to save your local pickup shipping method.
Add A Local Pickup Option For Postal Codes or ZIP Codes Using Conditions
This setup uses a ‘postal code/zip code’ condition to restrict local pickup from displaying at checkout. If you prefer to use postal code or zip code sub-zones, skip ahead to Add A Local Pickup Option For Postal Codes or ZIP Codes Using Sub-Zones.
1) Click Shipping on the sidebar menu, then select Scenarios from the drop-down list.

2) Click the Create scenario button.

General Settings
1) Enter a Scenario title, like ‘Local Pickup – Downtown’.

2) Leave the status set to On.

Conditions
1) Select Set restrictions.

2) Leave Condition match set to All conditions.

3) Select the Postal code/zip code condition type.
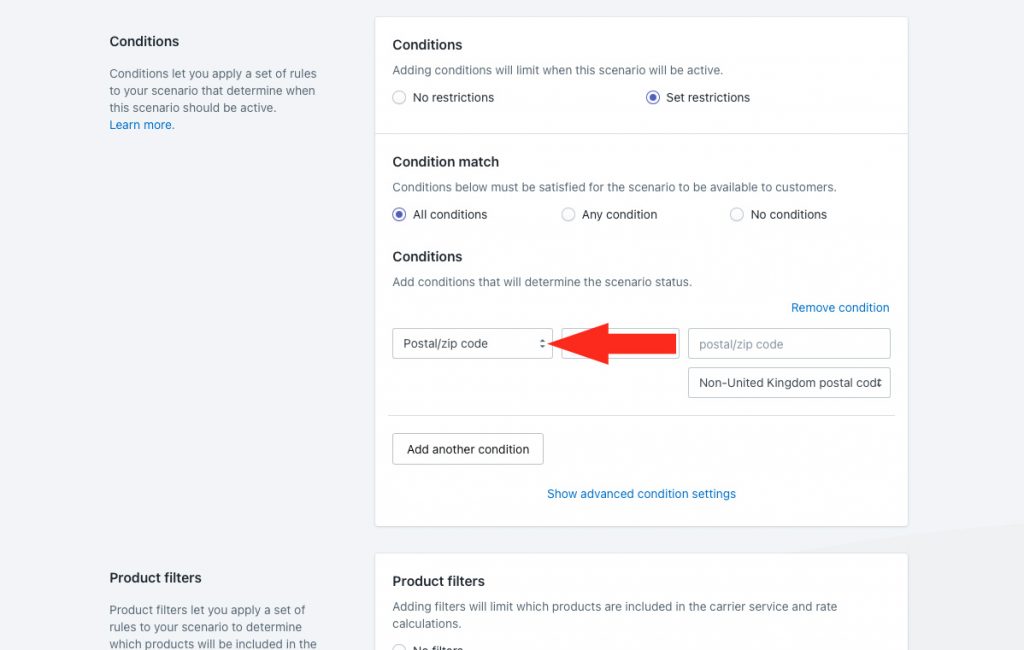
4) Select the condition logic.
For this example, we’ll leave it set to equals, since we want customers from the postal codes enter in Step 5 to get the local pickup option. If you prefer to prevent customers from postal codes or ZIP codes from getting local pickup, change the logic to does not equal.
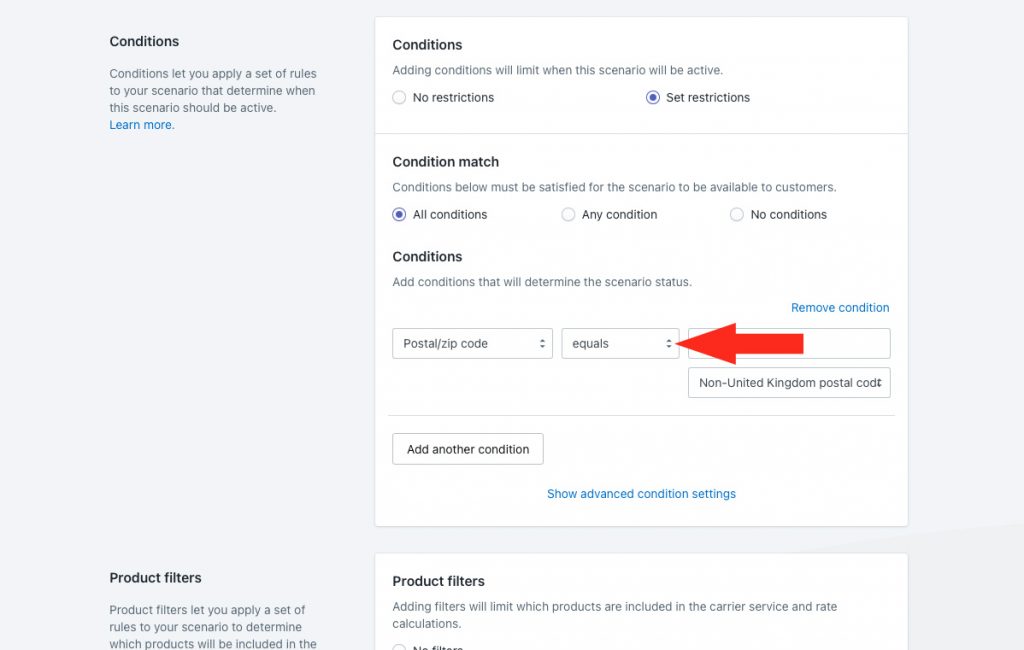
5) Enter postal codes or ZIP codes as the condition value. If desired, you can add multiple individual postal codes or ZIP codes separated by comma, or ranges of postal codes.
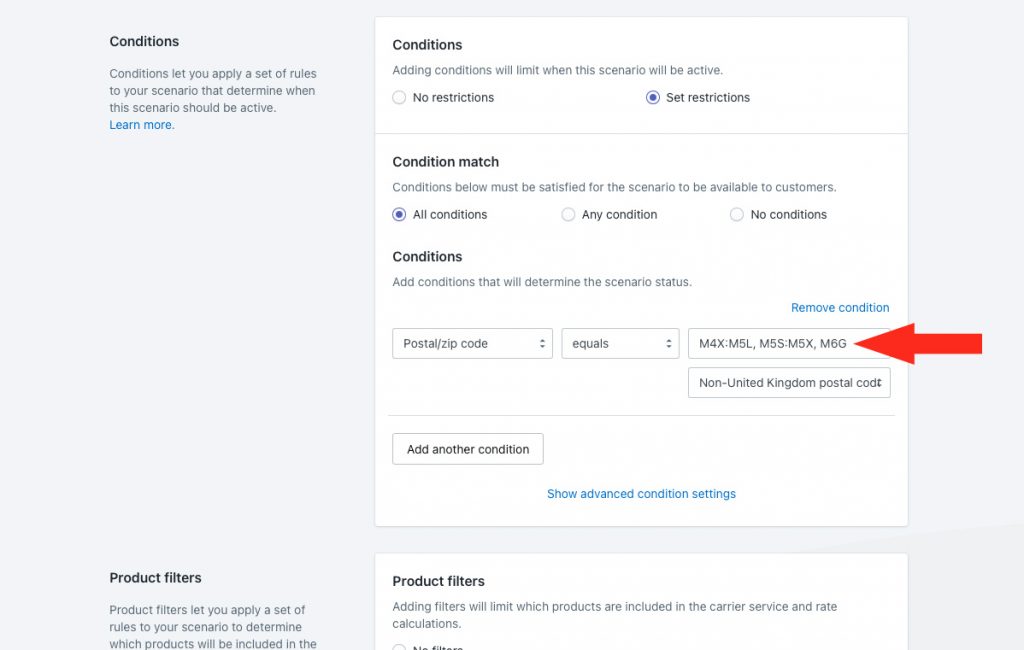
For example, if you want to include multiple postal codes or ZIP codes, you can add them all to a single condition value, separated by comma, such as ‘M4X, M5L, M5S’. This will include all complete postal codes starting with any of these three prefixes.
Or, you can enter ranges of postal codes or ZIP codes using a colon : to separate the range, such as ‘M4X:M5L’. This will include all complete postal codes starting with ‘M4X up to and including those starting with ‘M5L.
You can even include multiple ranges, separating each range by a comma, such as ‘M4X:M5L, M5S:M5X’. This will include all complete postal codes within each range, but will not include any postal codes outside either range. For example, a postal code starting with ‘M5P’ would not pass the condition.
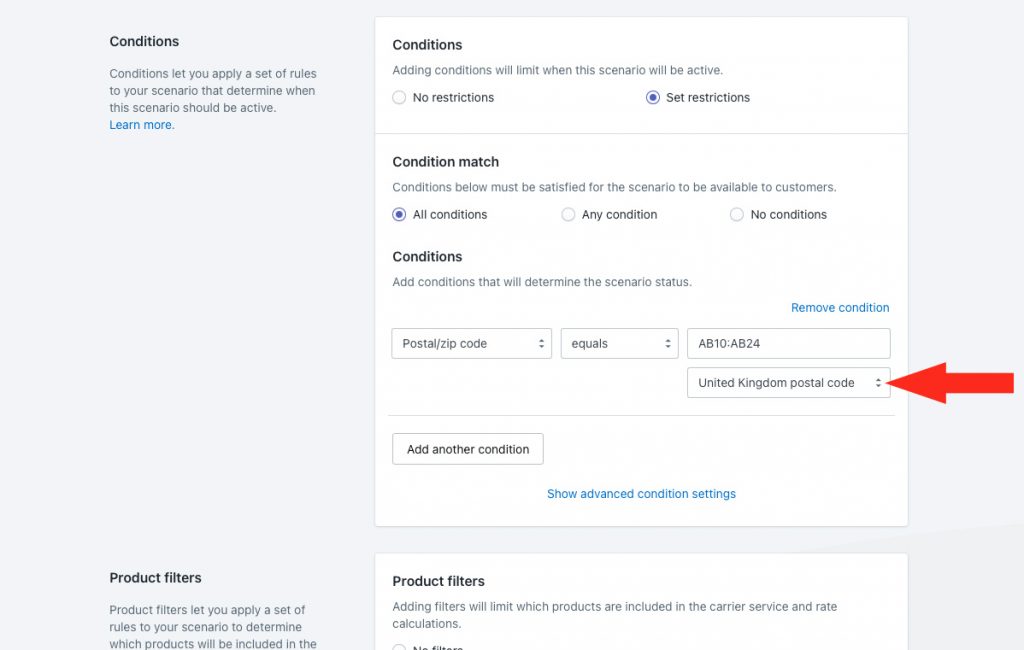
6) If you entered UK postcodes in Step 5, change the format setting to United Kingdom postal code.
For all other postal code or ZIP code values, leave the format setting set to the default Non-United Kingdom postal code.
Product Filters
1) Leave Product filters set to Match product conditions.
Product filters determine which products are included in the shipping method rate calculation. Because there are no product conditions in this setup, ‘Match’ is treated the same as ‘No filters’.

Save Your Settings
1) Click the Save button to save your local pickup Scenario.

Add A Local Pickup Shipping Method
In order to display a local pickup option at checkout, you still need to add a ‘shipping’ method to the Scenario.
1) Click the Create shipping method button to add a free local pickup option.

Select A Free Shipping Service
1) Click the downward arrow beside Custom services to display a list of options.

2) Select Free shipping from the list.

3) Click the Next button.

4) Select a Zone. You must select the zone that applies to the postal codes or ZIP codes referenced in your Scenario conditions.

5) Click the Configure shipping button.

General
1) Enter a shipping method Title, like ‘Local In-store Pickup’ or ‘Curbside Pickup’. The title entered here will be visible to customers.

2) If you want the local delivery option to be available right away, leave the status set to On. If you want to test it first before making it public, set it to Test.

3) Enter a description for your local pickup option, like ‘Call to arrange a pickup time’. We recommend limiting your description to 90 characters or less to ensure it displays properly on the checkout page.

Additional display settings are available for delivery times and service codes, which may not apply to your local pickup option. If you do need to adjust either of these settings, continue to Step 4. Otherwise, skip ahead to Minimum Order Threshold.
4) If desired, click Show additional display settings, then configure delivery time and service code settings as needed.

Minimum Order Threshold
Order thresholds are typically used for free shipping options. If desired, you can also limit when local pickup is activated by setting a threshold, such as an order minimum or a weight maximum.
1) Choose if you want to apply a free shipping threshold to your local pickup option.

You have two (2) settings to choose from:
Always offer free shipping – the free local pickup method will always be displayed to customers as long as the postal/zip code condition is met.
If you select the ‘Always’ option, skip ahead to Optional Settings.
Set a free shipping threshold – the free local pickup method will only be displayed to customers when the postal/zip code condition is met and the threshold is exceeded.
2) If you choose to set a threshold, select a threshold type.

You have three (3) settings to choose from:
Total – the local pickup option will be activated based on the total value of items in the cart.
Quantity – the local pickup option will be activated based on the total number of items in the cart.
Weight – the local pickup option will be activated based on the total weight of items in the cart.
3) Select a free shipping threshold logic.

You have six (6) options to choose from:
Greater than – the local pickup option will activate when the actual cart value is more than the value entered in Step 4.
Greater than or equals – the local pickup option will activate when the actual cart value is equal to or more than the value entered in Step 4.
Less than – the local pickup option will activate when the actual cart value is less than the value entered in Step 4.
Less than or equals – the local pickup option will activate when the actual cart value is equal to or less than the value entered in Step 4.
Equals – the local pickup option will activate when the actual cart value is exactly the same as the value entered in Step 4.
Does not equal – the local pickup option will activate when the actual cart value is anything but the value entered in Step 4.
4) Enter the free shipping threshold value. The local pickup option will activate when this threshold is exceeded, depending on the settings selected in Steps 2 and 3.

Optional Settings
Settings for custom shipping blending and rate blending give you further control of how shipping is calculated at checkout.
These settings are not required for this setup, and you can skip ahead to Save Your Settings.

Save Your Settings
1) Click the Save button to save your local pickup shipping method.

Add A Local Pickup Option For Postal Codes or ZIP Codes Using Sub-Zones
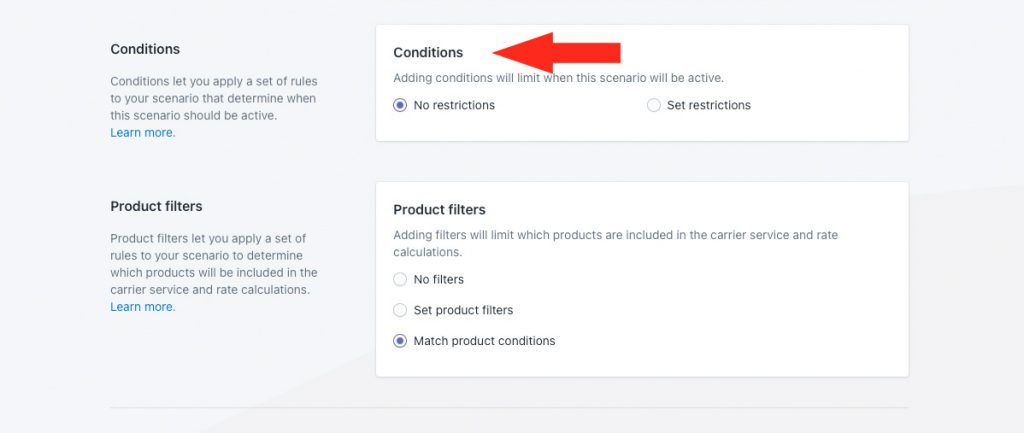
This setup has no conditions. Instead, the local pickup shipping method is assigned to a postal code or ZIP code sub-zone, meaning it will only activate to customers who live in that sub-zone.
1) Click Shipping on the sidebar menu, then select Scenarios from the drop-down list.

2) Click the Create scenario button.

General Settings
1) Enter a Scenario title, like ‘Local Pickup – Downtown’.

2) Leave the status set to On.

Conditions
1) Leave Conditions set to No restrictions.
Product Filters
1) Leave Product filters set to Match product conditions.
Product filters determine which products are included in the shipping method rate calculation. Because there are no product conditions in this setup, ‘Match’ is treated the same as ‘No filters’.

Save Your Settings
1) Click the Save button to save your local pickup Scenario.

Add A Local Pickup Shipping Method
In order to display a local pickup option at checkout, you still need to add a ‘shipping’ method to the Scenario.
1) Click the Create shipping method button to add a free local pickup option.

Select A Free Shipping Service
1) Click the downward arrow beside Custom services to display a list of options.

2) Select Free shipping from the list.

3) Click the Next button.

4) Click the drop-down arrow beside the main Zone that contains your sub-zone.
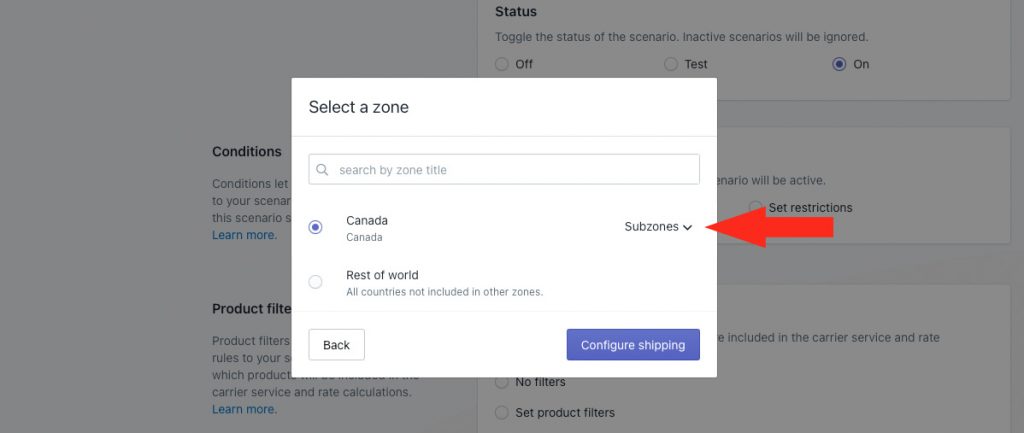
5) Select the sub-zone you wish to restrict the local pickup option to.
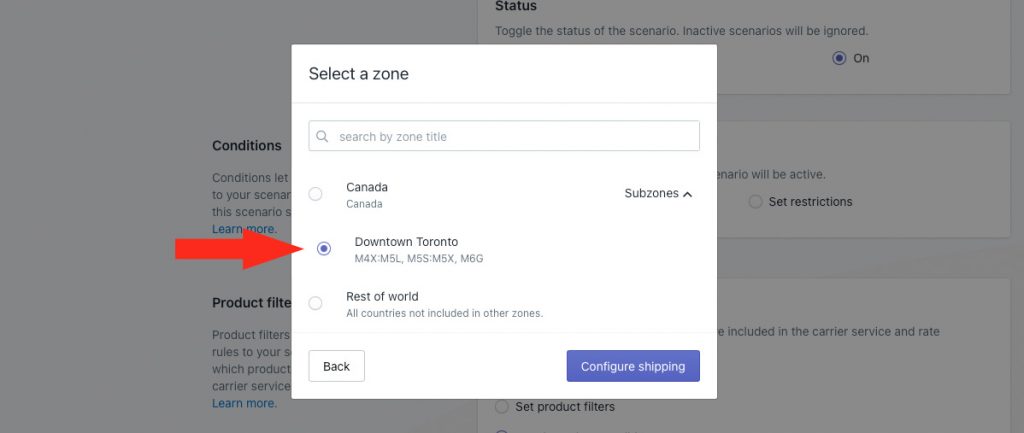
6) Click the Configure shipping button.
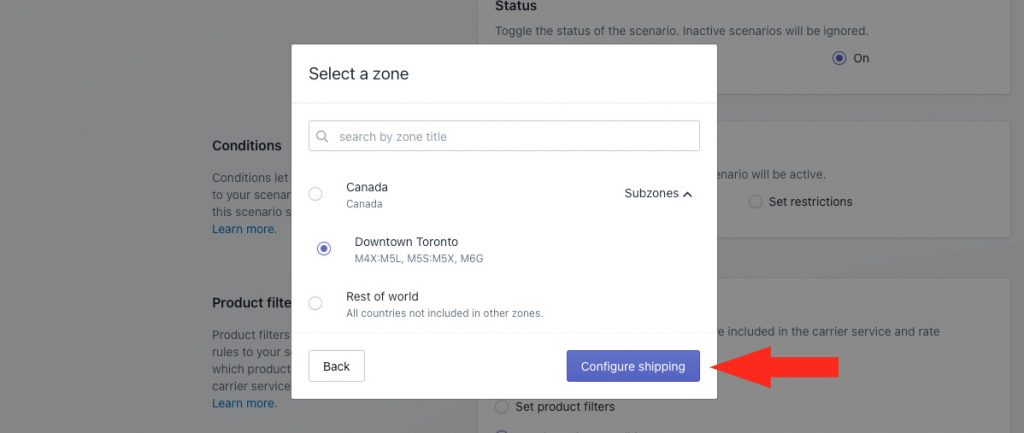
Only customers with postal codes or ZIP codes in the sub-zone will see the local pickup option at checkout.
General
1) Enter a shipping method Title, like ‘Local In-store Pickup’ or ‘Curbside Pickup’. The title entered here will be visible to customers.

2) If you want the local delivery option to be available right away, leave the status set to On. If you want to test it first before making it public, set it to Test.

3) Enter a description for your local pickup option, like ‘Call to arrange a pickup time’. We recommend limiting your description to 90 characters or less to ensure it displays properly on the checkout page.

Additional display settings are available for delivery times and service codes, which may not apply to your local pickup option. If you do need to adjust any of these settings, continue to Step 4. Otherwise, skip ahead to Minimum Order Threshold.
4) If desired, click Show additional display settings, then configure delivery time and service code settings as needed.

Minimum Order Threshold
Order thresholds are typically used for free shipping options. If desired, you can also limit when local pickup is activated by setting a threshold, such as an order minimum or a weight maximum.
1) Choose if you want to apply a free shipping threshold to your local pickup option.

You have two (2) settings to choose from:
Always offer free shipping – the free local pickup method will always be displayed to customers with a postal code or ZIP code within the sub-zone.
If you select the ‘Always’ option, skip ahead to Optional Settings
Set a free shipping threshold – the free local pickup method will only be displayed to customers with a postal code or ZIP code within the sub-zone when the threshold is exceeded.
2) If you choose to set a threshold, select a threshold type.

You have three (3) settings to choose from:
Total – the local pickup option will be activated based on the total value of items in the cart.
Quantity – the local pickup option will be activated based on the total number of items in the cart.
Weight – the local pickup option will be activated based on the total weight of items in the cart.
3) Select a free shipping threshold logic.

You have six (6) options to choose from:
Greater than – the local pickup option will activate when the actual cart value is more than the value entered in Step 4.
Greater than or equals – the local pickup option will activate when the actual cart value is equal to or more than the value entered in Step 4.
Less than – the local pickup option will activate when the actual cart value is less than the value entered in Step 4.
Less than or equals – the local pickup option will activate when the actual cart value is equal to or less than the value entered in Step 4.
Equals – the local pickup option will activate when the actual cart value is exactly the same as the value entered in Step 4.
Does not equal – the local pickup option will activate when the actual cart value is anything but the value entered in Step 4.
4) Enter the free shipping threshold value. The local pickup option will activate when this threshold is exceeded, depending on the settings selected in Steps 2 and 3.

Optional Settings
Settings for custom shipping blending and rate blending give you further control of how shipping is calculated at checkout.
These settings are not required for this setup, and you can skip ahead to Save Your Settings.

Save Your Settings
1) Click the Save button to save your local pickup shipping method.

Add A Local Pickup Option For Customers Within A Distance Range
This setup has no conditions. Instead, the local pickup shipping method determines the distance between your store and the customer’s address to restrict local pickup from being displayed at checkout.
1) Click Shipping on the sidebar menu, then select Scenarios from the drop-down list.

2) Click the Create scenario button.

General Settings
1) Enter a Scenario title, like ‘Local Pickup up to 25 km’.

2) Leave the status set to On.

Conditions
1) Leave Conditions set to No restrictions.

Product Filters
1) Leave Product filters set to Match product conditions.
Product filters determine which products are included in the shipping method rate calculation. Because there are no product conditions in this setup, ‘Match’ is treated the same as ‘No filters’.

Save Your Settings
1) Click the Save button to save your local pickup Scenario.

Add A Local Pickup Shipping Method
In order to display a local pickup option at checkout, you still need to add a ‘shipping’ method to the Scenario.
1) Click the Create shipping method button to add a free local pickup option.

Select A Local Delivery Service
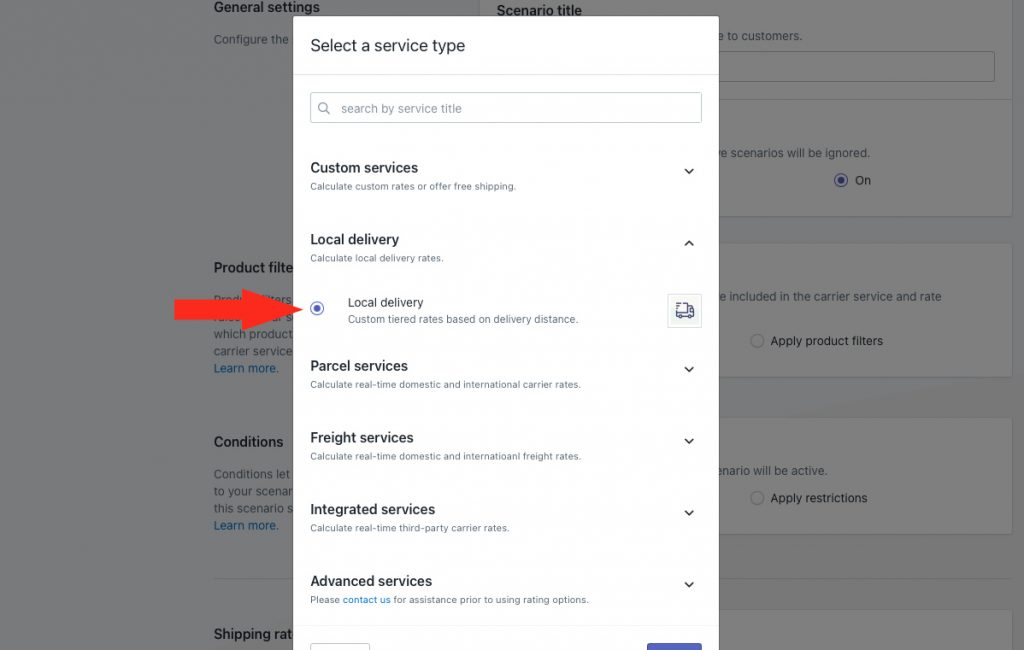
Unlike the other setup options for city or postal code restrictions, each of which uses a ‘Free shipping’ custom service, the Distance setup requires a ‘Local delivery’ service to access your Google API account.
1) Click the downward arrow beside Local delivery to display a list of options.
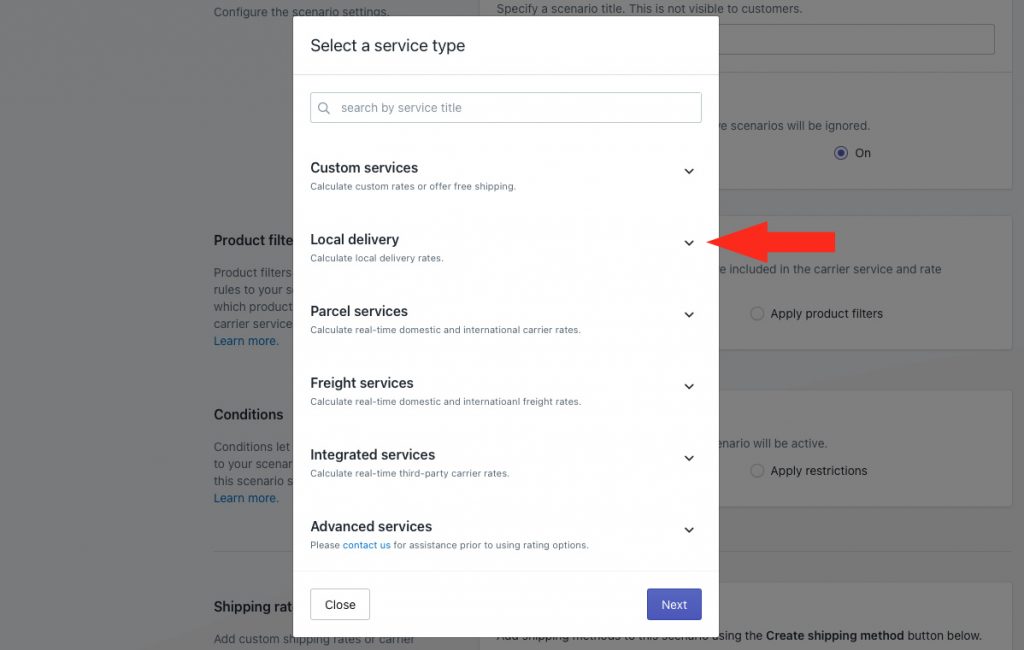
2) Select Local delivery from the list.
3) Click the Next button.
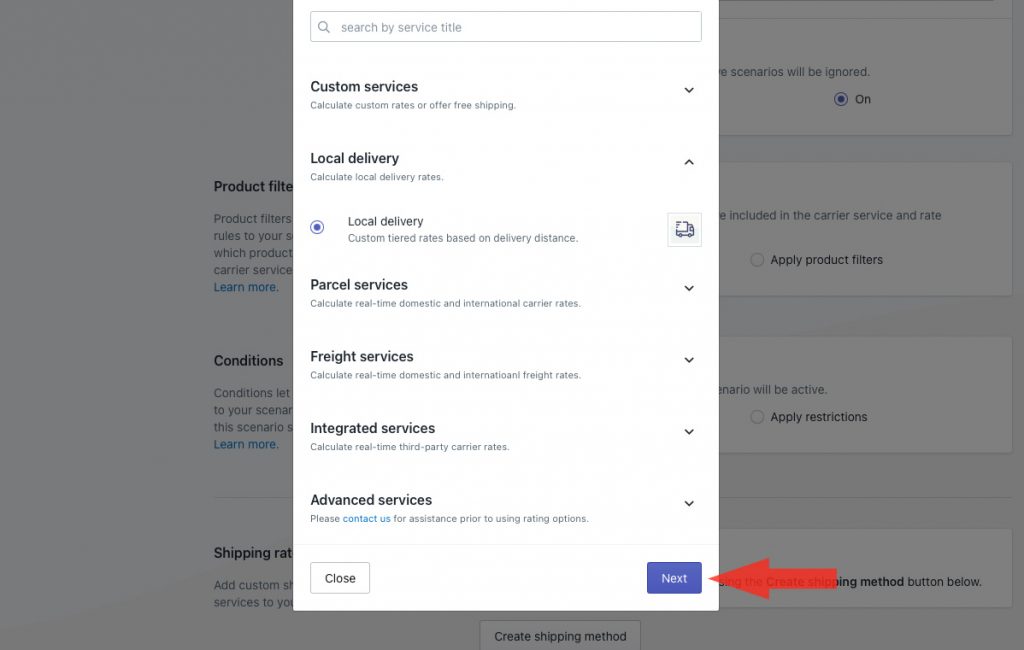
4) Select a Zone. You should select the zone that best aligns with the distance limit for your local pickup.

For example, if your store is in Canada, and you select a zone that does not include Canada, the local pickup option will not be displayed to customers with a Canadian address, even if they are within the distance range.
If it is possible for customers in multiple zones to qualify for local pickup – for example, if your zones are based on states, and you have ‘local’ customers in multiple states – you can copy this shipping method into each applicable zone after completing this setup.
5) Click the Configure shipping button.

General
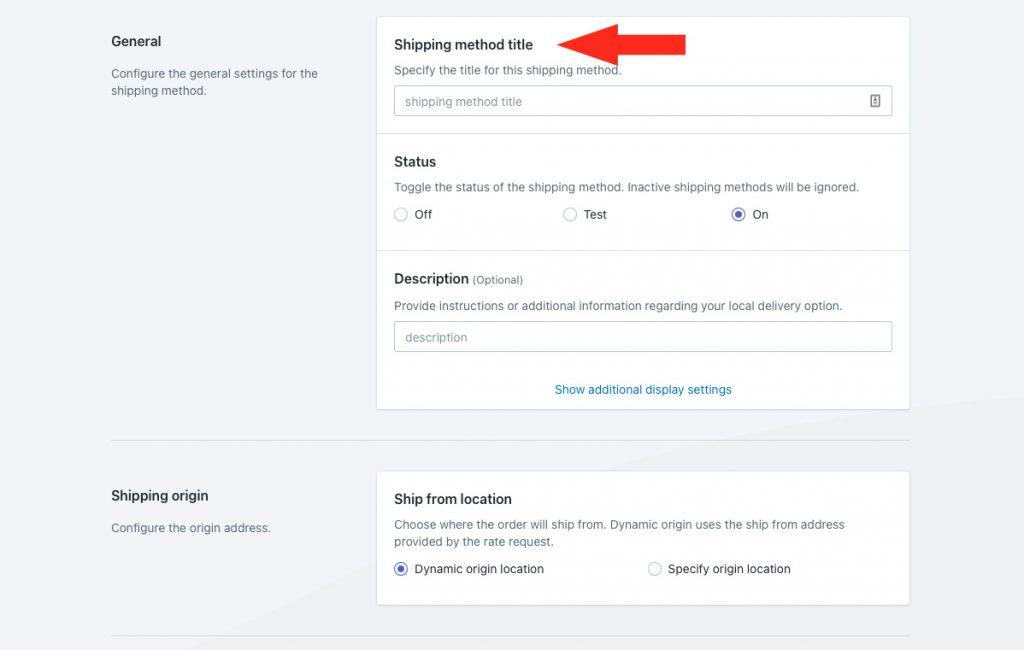
1) Enter a shipping method title, like ‘Local In-store Pickup’ or ‘Curbside Pickup’. The title entered here will be visible to customers.
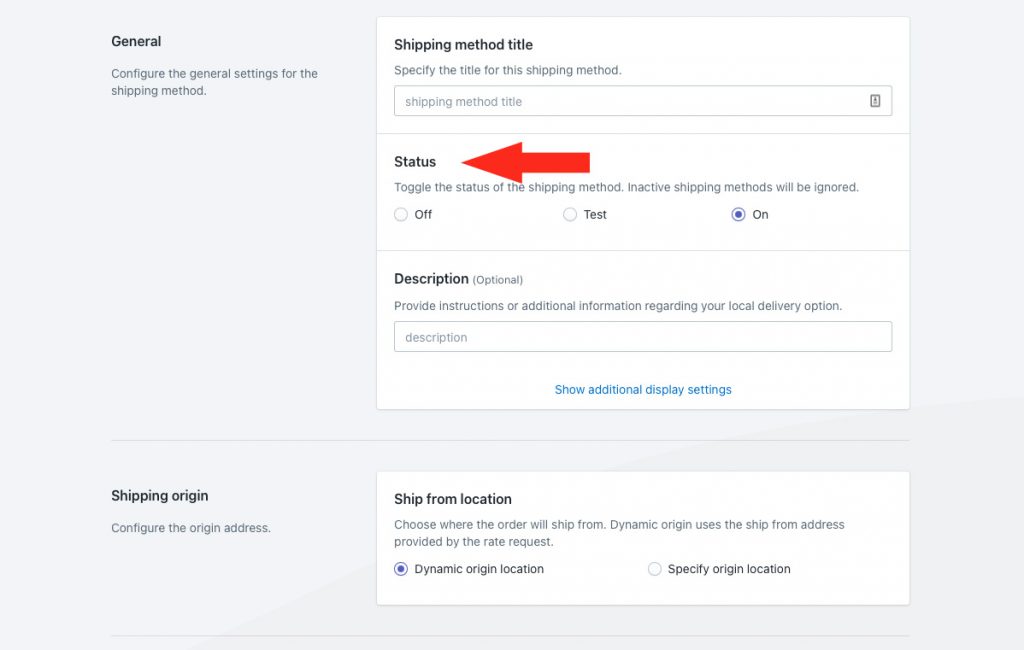
2) If you want the local delivery option to be available right away, leave the status set to On. If you want to test it first before making it public, set it to Test.
3) Enter a description for your local pickup option, like ‘Call to arrange a pickup time’. We recommend limiting your description to 90 characters or less to ensure it displays properly on the checkout page.
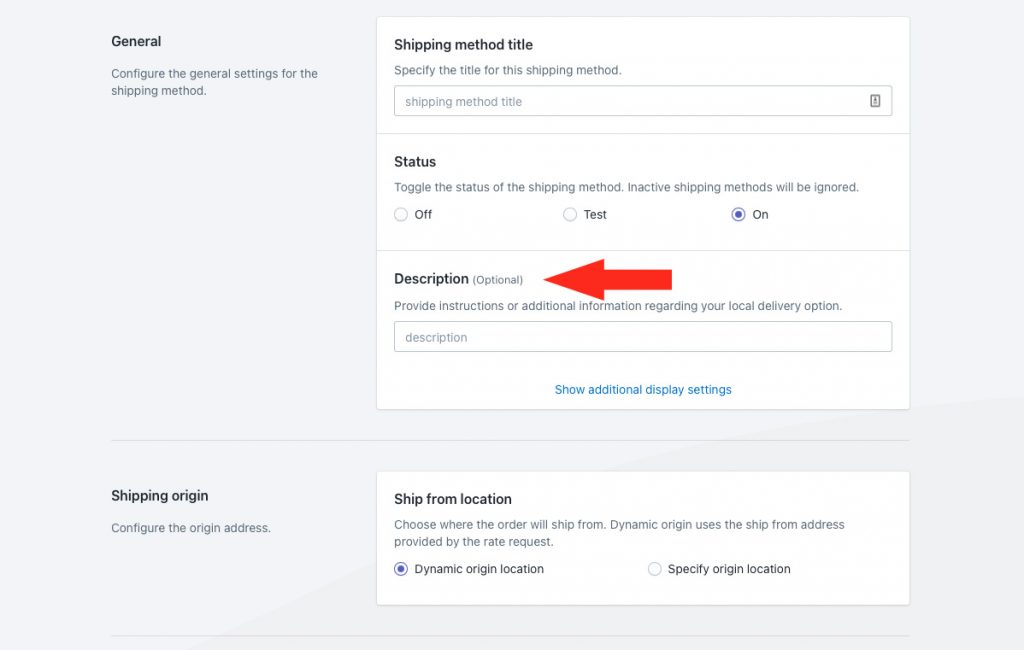
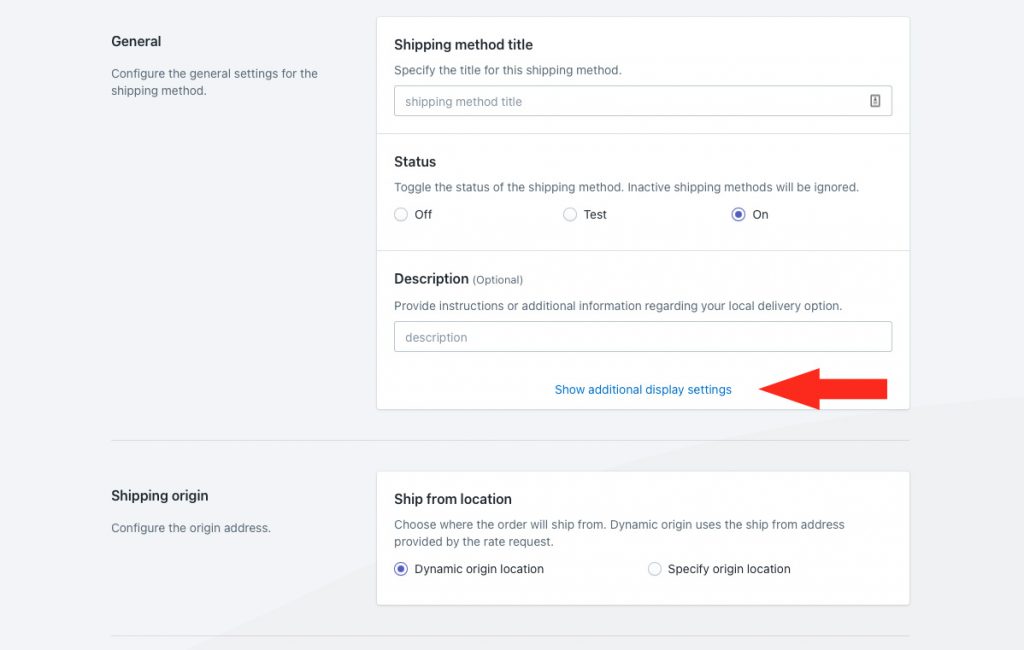
Additional display settings are available for delivery times and service codes, which may not apply to your local pickup option. If you do not need to adjust these settings, skip ahead to Shipping Origin. Otherwise, continue to Step 4.
4) If desired, click Show additional display settings, then configure delivery time and service code settings as needed
Shipping Origin
Distance can be calculated using the primary location set up in Shopify or a custom ship-from location. This is useful if your local pickup service is managed at a location other than your primary Shopify store location.
1) Select the ship from location.
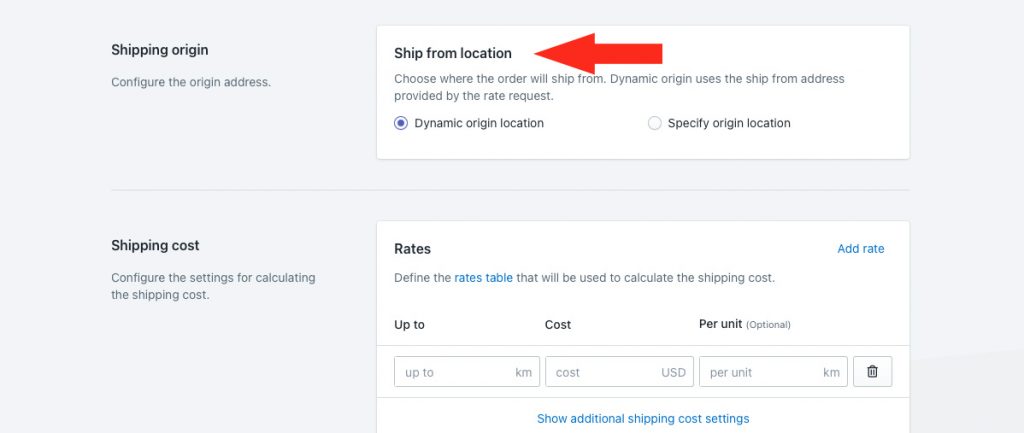
You have two (2) settings to choose from:
Dynamic origin location – local pickup eligibility will be based on the distance between the customer’s address and your primary Shopify location address. This is the default setting.
If you select the ‘Dynamic’ option, skip ahead to Shipping Cost.
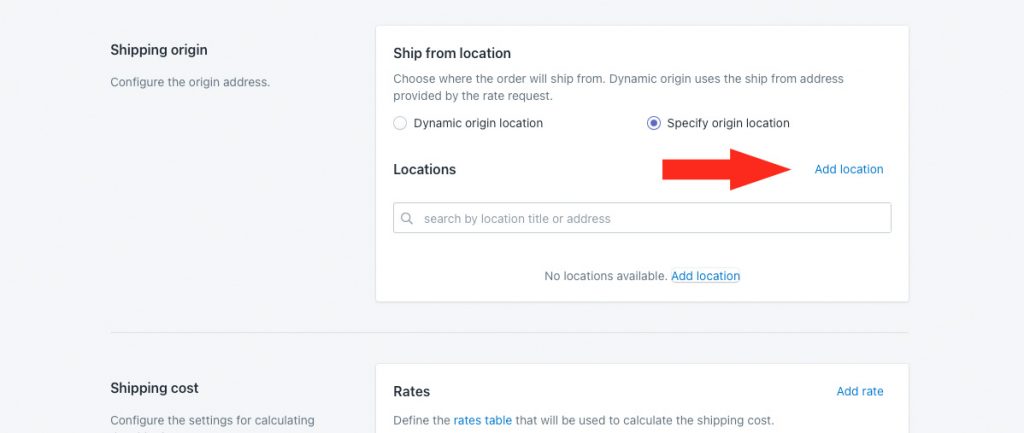
Specify origin location – local pickup eligibility will be based on the distance between the customer’s address and the address specified in Step 2.
2) If you selected ‘Specify origin location’ in Step 1, select a location. This location will be used as the starting point for distance calculations in this shipping method.
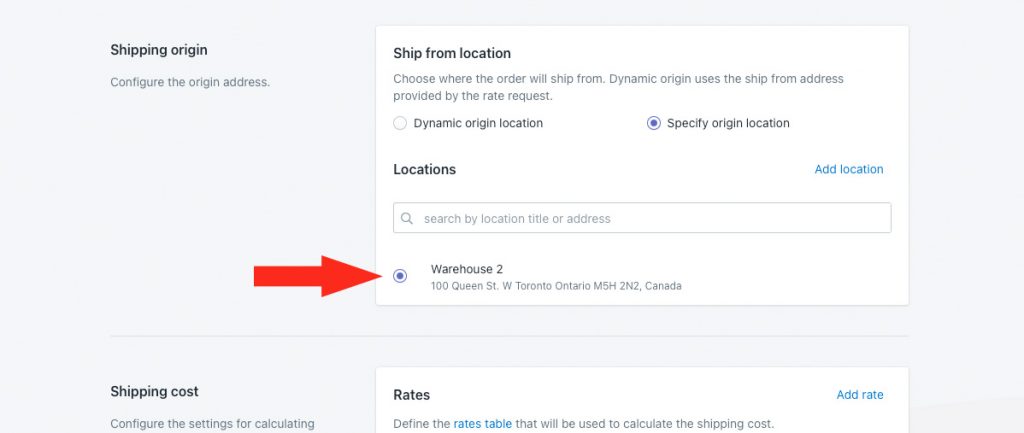
If you have not yet set up a custom origin location, you can add one from the shipping method by clicking Add location.
Shipping Cost
Unlike the ‘Free shipping’ service used by the other setup options for city or postal codes, the distance setup uses a ‘Local delivery’ service which has the option to set a shipping cost. For this setup, we’ll be setting a zero-dollar (free) shipping cost to ensure that customers are not charged for picking up their order.
This is also where you determine the distance range for your local pickup option.
1) Enter the maximum allowable distance for your local pickup option as the Up to limit, such as ’25’ (25 km).
Customers with an address outside of this range will not see the local pickup option displayed at checkout.
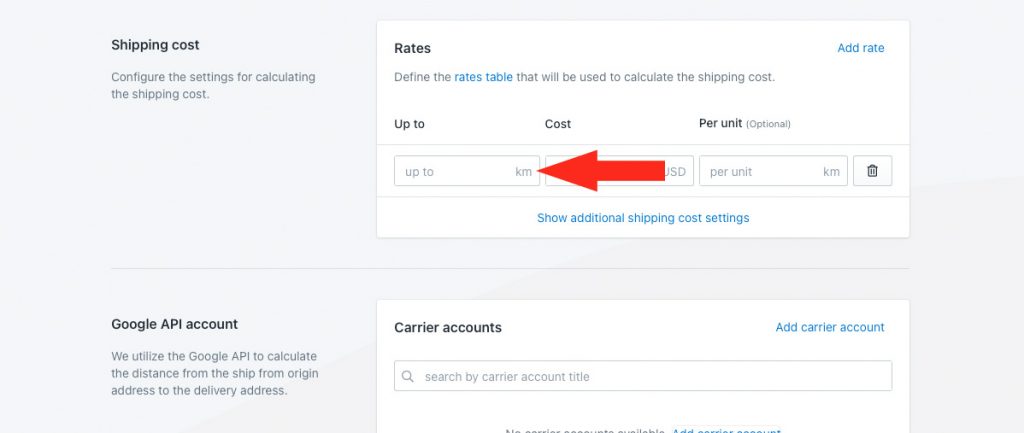
Distance units are configured in your Intuitive Shipping General settings, based on your distance preference – either kilometers or miles.
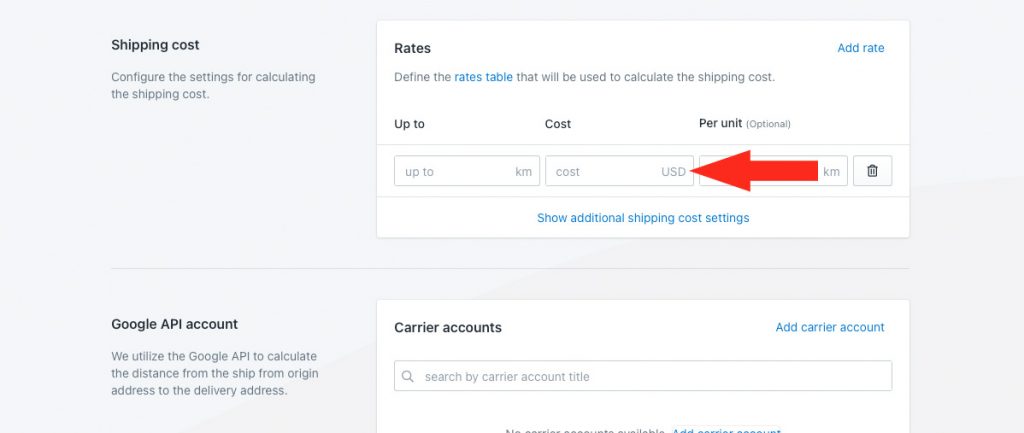
2) Enter ‘0’ (zero) as the Cost. The cost will be displayed as ‘Free’ at checkout.
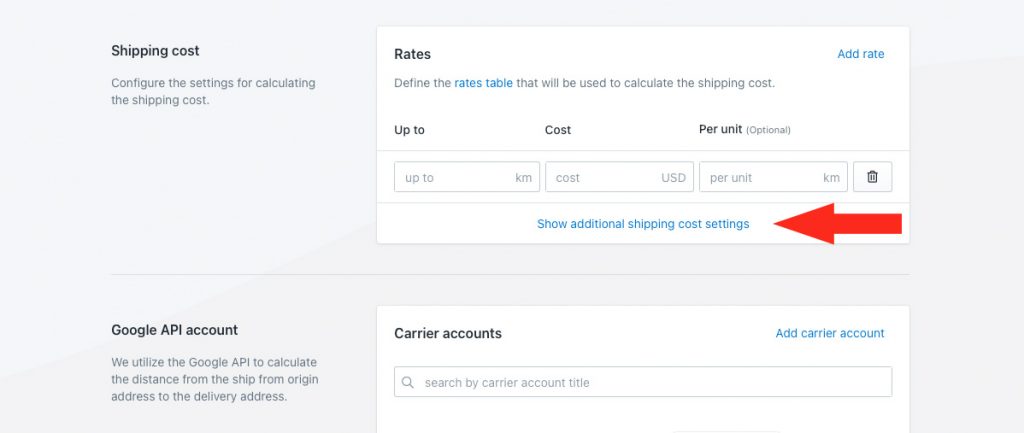
3) Leave the Per unit field blank. This field is not required for this setup.
Additional settings are available for cart splitting and rate row blending. These settings are not required for this setup, and you can skip ahead to Google API Account.
Google API Account
A Google API account is required to complete this setup. If you don’t have a Google API account connected to Intuitive Shipping, you will be unable complete this setup.
If you have not yet created an API billing account with Google, you must do so before proceeding.
Once your API account has been created, and you have obtained your API key, you can return here to finish connecting your account, starting at Step 1 below.
If you connected your Google API account to Intuitive Shipping prior to starting this setup, skip ahead to Step 5.
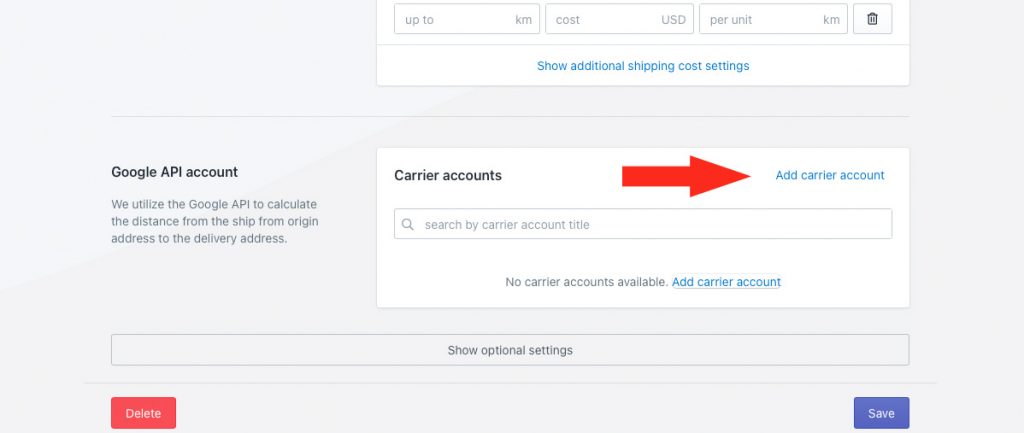
1) Click Add a carrier account.
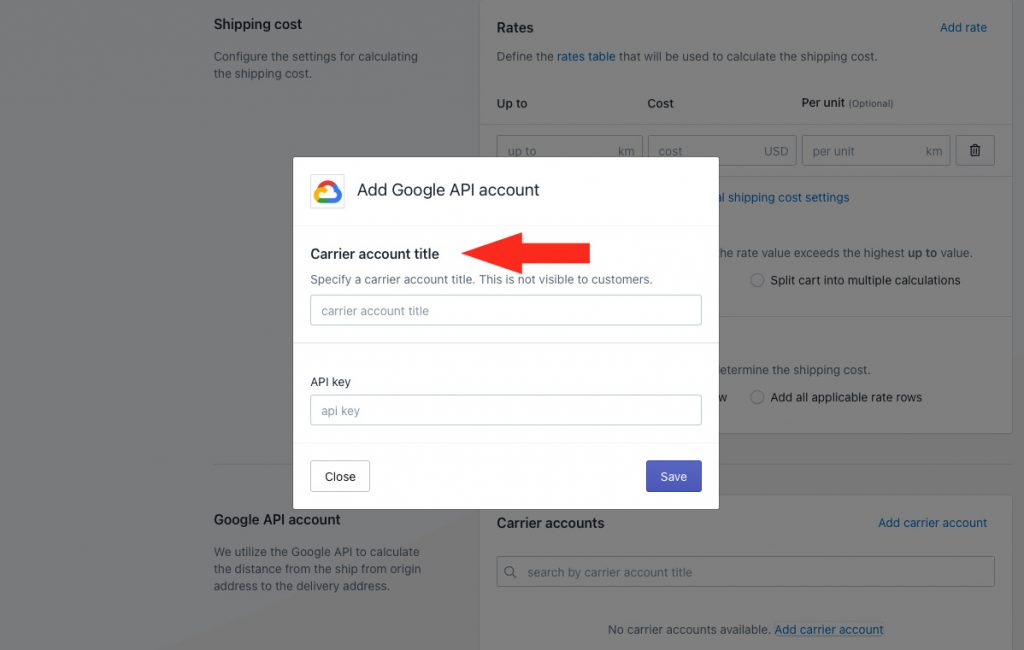
2) Enter a carrier account title, such a ‘Google Distince’ or ‘Google API’.
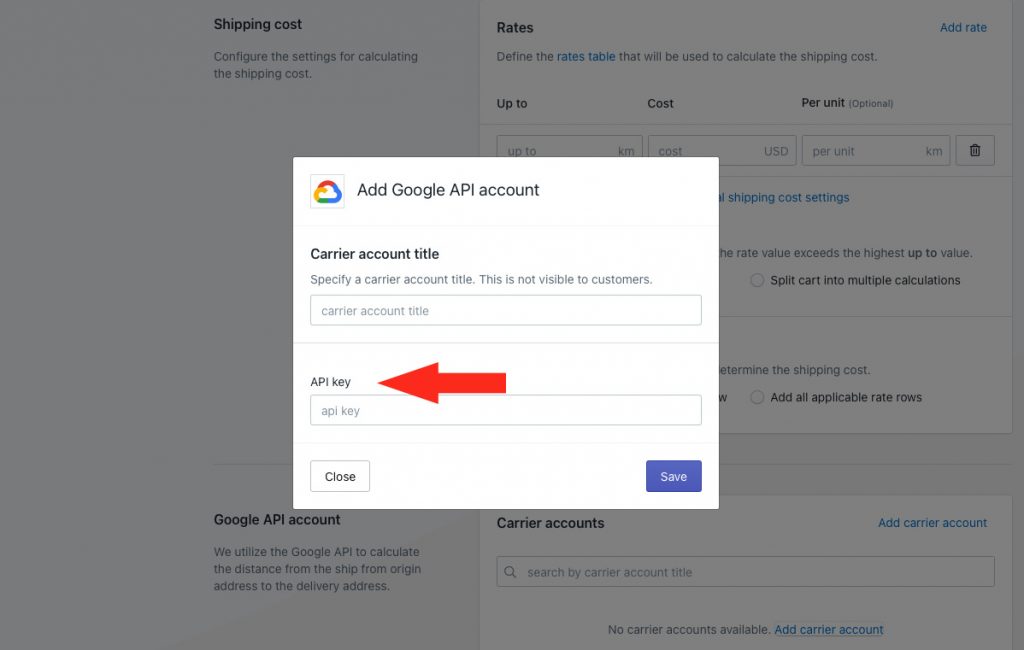
3) Enter your Google API key. This is provided by Google in your API account.
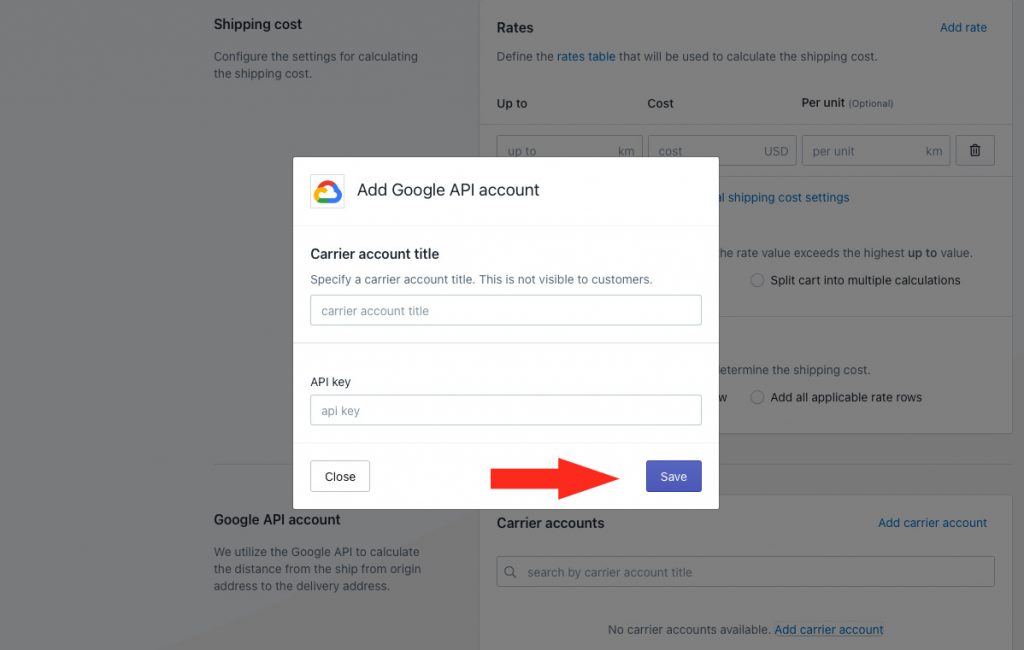
4) Click the Save button.
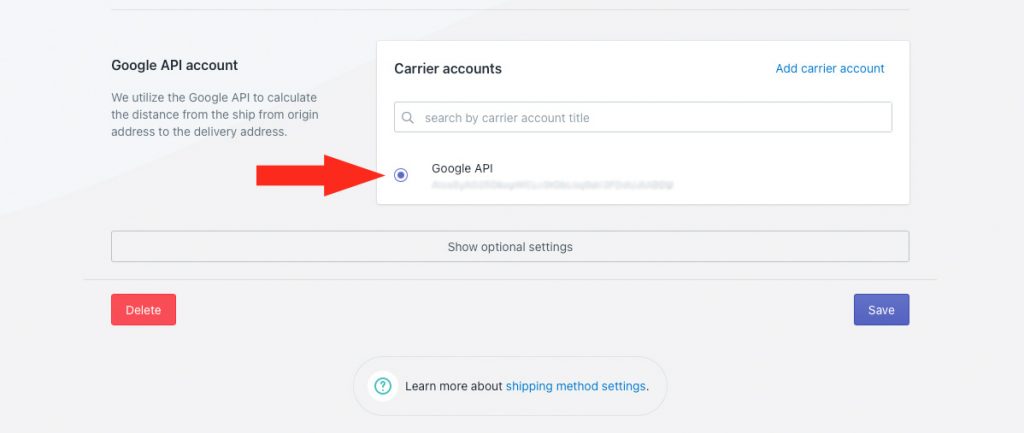
5) Select your Google account.
Optional Settings
Settings for distance calculation type, fallback rate, cost adjustments, free shipping, custom shipping blending and rate blending give you further control of how shipping is calculated at checkout.
For this setup, only the optional local delivery distance calculation type is applicable.
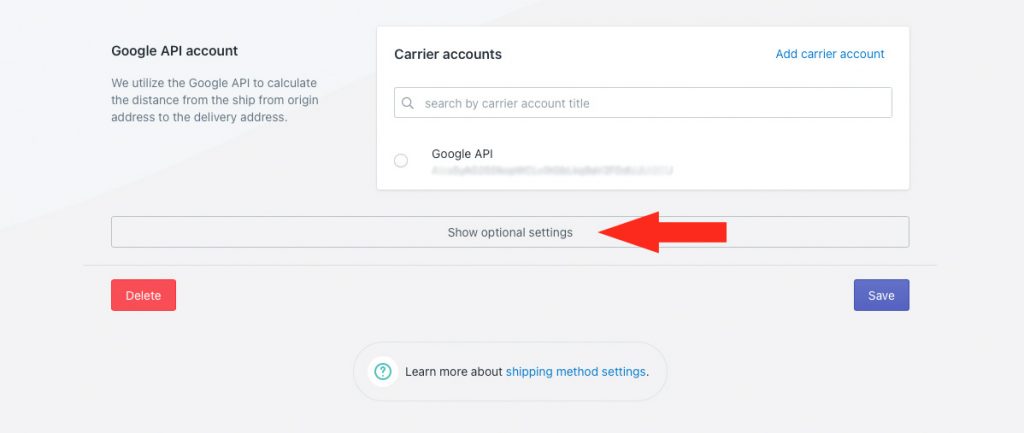
1) Click Show optional settings.
Local Delivery Settings
Intuitive Shipping uses your Google API key to calculate distance between your shipping origin and the customer’s address. There are two ways this can be done.
By default, we attempt to calculate distance using your Distance API to get driving directions. If that fails, we attempt to calculate distance using your Geocoding API. If desired, you can configure your distance-based local pickup option to only use one method or the other.
Distance API uses your shipping origin address and the customer’s address to look up driving directions with Google Maps. This method generally passes about 75% of the time. However, if you live in a region where postal codes are not used, or not recognized by Google Maps, this method will likely fail.
Geocoding API converts your shipping origin address and the customer’s address into geo-coordinates, and measures distance point-to-point (or ‘as the crow flies’). This method almost always passes, except if Google is unable to convert an address into coordinates.
Each method results in one API call to your Google API account. That means, if you select Automatic in Step 1, Intuitive Shipping will make only one API call about 75% of the time, and require two API calls about 25% of the time.
API calls cost $5.00 per 1000 calls. Google provides a $200 USD credit each month for an unlimited time. That’s 40,000 API calls – or roughly 30,000 to 40,000 distance-based rate calculations – per month for free.
1) Select a distance calculation type.
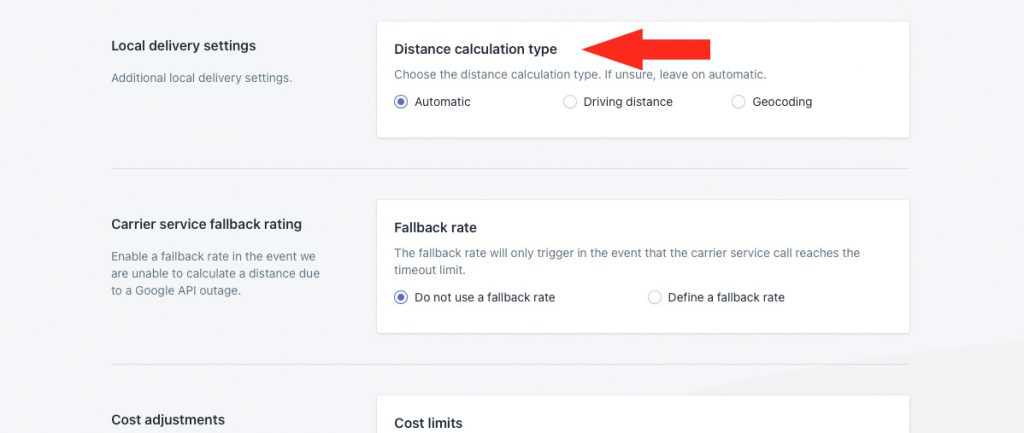
You have three (3) settings to choose from:
Automatic – Intuitive Shipping first attempts to calculate distance using your Distance API. If that fails, we attempt to calculate distance using your Geocoding API. This method may result in up to two API calls per checkout to your Google API account. This is the default setting.
Driving directions – Intuitive Shipping attempts to calculate distance using only your Distance API. This method will result in only one API call per checkout to your Google API account.
If you select this option and it fails, Intuitive Shipping will not fall back to Geocoding. No rate will be returned to the customer.
Geocoding – Intuitive Shipping attempts to calculate distance using only your Geocoding API. This method will result in only one API per checkout call to your Google API account.
If you select this option and it fails, Intuitive Shipping will not fall back on Driving directions. No rate will be returned to the customer.
Save Your Settings
1) Click the Save button to save your local pickup shipping method.

How It Works
Whichever setup option you use – city conditions, postal code/zip code conditions, sub-zones or distance – your local pickup option will only be displayed to customers with an address that meets the restrictions you’ve set up here.
That means, a customer with an address outside of your local pickup area will only see your delivery options. A customer with an address inside your local pickup area will see both a delivery option and a pickup option.
Check out more common setups or look at additional setups.
